by
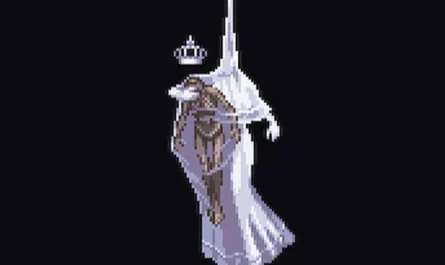
by Karmelita, The Singer Skarr , is one of the enemies we have to defeat in Act 3 of Hollow Knight Silksong in order to complete the main mission of that act called “The Old Hearts”.
This mission requires us to obtain 3 “Old Hearts,” and one of them is Karmelita’s. However, I’ll tell you in advance, in case you didn’t know, that although the game shows 3 hearts, there are actually 4. In any case, you only need 3 to complete the mission and advance in the act.
Balloon game review on the official website
I’ll tell you right now that this is one of the toughest bosses in the game, but with this guide, the battle will definitely be easier. Let’s get started!
Location: Distant Fields

The first thing is to make sure you have progressed through the first missions of Act 3, since in these you obtain the ability “Silence Flight” in the Abyss, which is an essential ability to reach Karmelita.
Although Karmelita herself is located in the Far Fields, to reach her you must travel from Hunter’s March. I’ve marked the exact route in green in the image. Just to the far left, where the green line begins, you must use the Silk Flight. If you continue from there, you will unlock this new area of the Far Fields where you will find this character.
When you reach her exact location (Hornet’s head icon, although the quest itself already marks the location), you’ll find an NPC there with their back to you who appears to be Karmelita herself. Now you have to play the Needle in front of her while holding down the down direction to play the Elegy of the Depths . You have to play it for a while.
You’ll appear in a new area that seems to be Skarr’s Arena; you’re initially in Karmelita’s memories. This is where you’ll face her past self.
In this area you have the mission “The Fastest in Telalejana”, make sure to complete it to get a Mask Fragment .
Waves Before Karmelita
Before Karmelita enters the battle, you have to defeat waves of enemies that won’t give you too much trouble.
First, two of those small, ninja-like ants appear, along with one of those warriors wearing a skull helmet. Once you defeat some of these enemies, one of those flying ants that throws its harpoon will join you, followed by another warrior with a skull helmet.
After this comes the worst part: two new enemies, slightly more powerful than the previous ones , but you’ll see they’re not that bad. Be especially careful with their aerial attack, where they swoop vertically down to the ground.
Karmelita’s Attack Guide
These are all his attacks:
- Frontal Combo : Unleash 3 combo attacks while she moves slightly forward. Jump over her and hit her with the Downward Aerial Strike. If you have time, you can try to hit her from behind.
- Spin Attack : He spins with his weapons raised while moving slightly forward. In practice, you have to do exactly the same as in the Front Combo.
- Ball + Spikes : It transforms into a large ball and leaps forward, landing on the ground. Upon impact, it creates a wall of relatively low spikes. I recommend jumping to avoid being hit by the spikes (you can also dash forward to pass underneath) and then using a Downward Air Slam to bounce off them and avoid damage from the spikes on the ground. Be careful, as it sometimes feints backward to avoid being hit.
- Disc Throwing : She jumps, flips upside down in the air, and throws a pair of discs at you that travel in a parabolic arc. Dodge them, then try to get close enough to hit her and back away. Sometimes she also throws them from the ground; the idea is the same.
- Ball + Discs : It will make that ball-like motion so you think it’s going to do “Ball + Spikes,” but instead it will throw discs. Be very careful so you don’t get caught off guard.
- Block : It’s not a parry , but it can block some of the frontal attacks you throw at it while it’s on the ground. If that happens, follow up with another attack immediately afterward, and that one will almost always land; then run away.
After a few blows, he lets out a loud scream and phase 2 begins.
Phase 2
The combat remains more or less the same, but some of its attacks improve, it acquires some new ones, and the boss becomes more aggressive:
- Throw Discs + : The same, but now it often throws the discs twice with a slight separation between each set.
- Spike Charge : A charge across the screen along the ground, leaving bone spikes emerging from the ground in its wake. Bounce off them with a Downward Air Slam and then stay airborne until the spikes disappear (filling the entire ground with them). Note that you can use the spikes themselves to bounce off with the Needle if you’re about to fall on them.
Just when you think it’s almost over… not at all, it will scream again and then it’s phase 3.
Phase 3
Nothing changes, except now he relentlessly chains attacks together with barely a pause , resulting in a constant barrage of blows from him. You’ll have to activate your ultra-instinct mode, constantly dodge, and hit him whenever you can (usually with the Downward Aerial Strike).
Strategy and Tips
I used the Reaper build that I usually use (it suits me too well, to be honest):
- Magnetite dice.
- Fractured Mask.
- Druid’s Eye.
- Long Claw.
Also, don’t forget to get the final upgrade for Hornet’s Needle; it helps a lot. I’ve linked below to the mission guide you need to complete to get it and max it out.
To heal, the best thing you can do is bounce off one of the side walls of the stage, perform a double jump to reach the highest point possible (ideally in the center), and heal in mid-air. Healing this way is very safe and in most cases won’t hit you. If you use Reaper like I did, make sure to collect all the silk orbs, as silk is invaluable in this battle since it’s rather long and you’ll most likely need to heal several times.
If you follow all the tips in the attack guide and heal carefully, she’ll eventually fall. The worst thing about this boss is that things get much harder with each phase, and in the third phase, Karmelita practically doesn’t let you breathe. You’ll spend a lot of time hovering in the air and hitting her with the Downward Air Strike.
Reward for Defeating Him
Defeating him grants you these 2 rewards:
- Huntress Heart : As I mentioned at the beginning, it is one of the 3 hearts you need to advance in Act 3.
- Achievement/Trophy «Diva» .