 by
by The Troublemaker is a rather peculiar Darkest Dungeon boss because if we want to eliminate him we will have to do it quickly since after a few turns he will go away, so to defeat him you will have to cause him a lot of damage before he goes away.
This is an optional boss, so you don’t need to defeat it; although it is true that it is worth it because you can get many interesting things from this boss. He stands out for being insanely fast, he will attack you like 3 times each turn and for having pretty decent damage as well as also inflicting a lot of stress on the party.
This is also a boss that you are very interested in defeating (or at least scaring away, which is getting it to fly away) since it will collect the Trinkets that your characters lose when they die (you know, when a character dies it leaves it on the ground their Trinkets, if you can’t collect them, the Brawler will collect them and take them back to his nest). Come on, if you want to get them back, you’ll have to go for him. You will have to check the town well in search of a mission in which this enemy appears. As long as you scare him away , you’ll get the Trinkets back , but if you want to get all the rewards that he can give us (he has interesting things, keep an eye on him at the bottom because he gives very good things), you’d better try to defeat him. You will need a lot of damage, yes.

I recovered a few Trinkets!
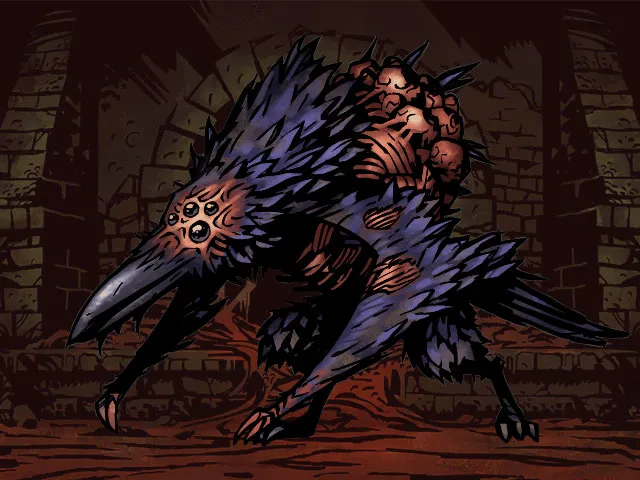
HOW TO DEFEAT THE BRAWLER
The Brawler won’t be alone, he’ll be accompanied by another enemy called the ” Brawler’s Nest ” (he’s the one you’ll have to make sure you defeat to get your Trinkets back). This enemy is quite slow and doesn’t bother you too much, but since he has a lot of life, we will lose a lot of time trying to defeat him and therefore it will be more difficult for us to kill the Rioter before he takes off.
So nothing, let’s see everything about two enemies:
ATTACK GUIDE
As I have already mentioned, it stands out for attacking about 3 times each turn, so you will have to be very careful with it. But that’s not all, it also has a high Evasion (it will dodge many attacks, it will be difficult to lower it, I already said it) and it also has a good chance of inflicting a critical hit, so be careful with stress ( which also has several attacks to increase it, it’s a battle where you receive a lot of stress).
Let’s see their attacks:
- Peck : The attack that causes the most direct damage and the one you should fear the most since it deals a critical hit very often (it also has a lot of Accuracy). It will hit a hero from a random position. On top of this you can also apply Bleed and will advance by doing so.
- Spit Up : Light damage attack that has 2 effects. The first is that it can apply a debuff that applies -15 Accuracy (to make it cost even more to hit) to the character it hits and the second is that it can also cause a Disease . It is only a 15% chance to apply Disease, but these are very annoying and as they accumulate, things can get tricky.
- Squawk : Causes very little damage but will greatly increase stress to one of your random characters.
- Point the Killer : Attack with little damage but will hit all your characters at once, the worst thing is that it has a high chance to apply a stress increase to each of your characters. Doing so will also make it faster and move backwards.
- Riotous Escape : It is the ability that he will use to get away. It will basically go away and before that it will put an enormous amount of stress on all of our characters. If you have them a little touched with stress, it is almost certain that they will reach 100 stress, so they will have to pass a check-up. Also, then you will have to heal them in the Freehold .
As you can see, it has a lot of damage and also applies a lot of stress. You will have to be very careful with both aspects to succeed in this battle.
We won’t talk about the Brawler’s Nest because it’s more for bulk than anything else, it won’t do much, it’s more of a damage sponge with a lot of health.
RECOMMENDED CHARACTERS AND EQUIPMENT

Regarding characters, those who have good damage are very useful and also those who inflict a good amount of Bleeding (since he attacks so many times, the damage over time is applied to him very quickly) and of course those characters who have interesting damage modifiers against beasts. And don’t forget to bring a healer, of course.

This is an example team that worked well for me.
- Diabla : Diabla is clearly the best option for the first position, although the other tank type characters like especially the Leper or the Man at Arms could also be an option, although in my opinion the best option is the Diabla for its tremendous damage to all positions.
- Flagellant / Bandit / Canine Master : The 3 characters are a very good option to cause damage to the boss. The Flagellant has some tremendous Bleeds, which will be very noticeable given the very high speed of this boss and the amount of his actions per turn; the Bandolero is fantastic also because of his good damage and because his counterattack will jump many times; and the Canine Master has very good damage modifiers against Beasts, next to the Bone, it will deal a lot of damage to the boss.
- Jester : I think he is a practically mandatory character since he can help us a lot to manage the high stress that this battle entails, we can also boost our teammates or apply some good Hemorrhages. He has everything it takes in this boss, so he comes up great.
- Vestal / Occultist : You will need a Healer to heal the damage of the «Peck» skill. I prefer the Occultist because of the higher damage from him, but the Vestal is a safer option for healing.
With these characters it shouldn’t take too long to at least make it to the point where he leaves to get your trinkets back (but be sure to defeat the Nest quickly). If what you want is to defeat him, I would recommend replacing the Jester (or you focus 100% on the offense with your Jester, it is another option) with one of the damage characters that I have mentioned above since then you will want to have a very high damage to defeat him before he leaves.
STRATEGY
You must defeat the Nest as quickly as you can (only if you are interested in recovering your lost Trinkets, otherwise focus on the Rioter) and after that you start attacking the Rioter with all your characters. As I have already mentioned, the best thing you can do is to apply a lot of bleeding to him (those characters that increase the probability of applying Bleeding are very key, such as the Flagellant) and try to be very aggressive with him. It’s also a good idea to equip your characters with Trinkets that increase their chance to apply Bleed.
The Occultist is a better option in that sense since it causes much more damage than the Vestal, but be careful because you already know that its cures are much more risky. In my opinion, the perfect team would be Diabla, Flagellant, Canine Master (Jester if you just want to scare him away) and Occultist, but you can try other combinations of the characters I mentioned above. Little more to say, it’s a DPS battle.
REWARDS FOR DEFEATING
If you manage to get him to get away, you will get all your lost Trinkets back. But in addition to this, your characters can randomly get a positive or negative trait that only applies to that boss.
Let’s look at the Positive Traits first , they are very worth it, so pray that it gives you some:
- Thanks Corvid : +6 Evasion and +25% Movement Resistance.
- Raven Eye : +8 Pre and +8% Patrol.
- Corvid Resistance : +33% Disease Resistance. I don’t like this too much, you can take it off.
It can also apply Negative Traits that are horrible, so you will have to resort to the Sanatorium:
- Corvid Appetite : +100% food consumed.
- Corvid Blindness : -10 Pre when torch is above 50.
- Corvid Curiosity : 27.5% chance to interact with any Curio (this can mess us up a lot).
Also, you can drop one of these Trinkets on us; keep in mind that they are unique, so you can never get one that you already have:
- Cruel Claw :
- +5% CRIT.
- +33% Disease Resistance if Torch < 75.
- +18% Bleed Application if Torch < 50.
- +16% Effort received.
- Eye of the Raven :
- +10 PRE.
- +33% Disease Resistance if Torch < 75.
- +18% Bleed Application if Torch < 50.
- +16% Effort received.
- Decrepit Wing Feather : I like this one for a Jester.
- +10 Evasion.
- +33% Disease Resistance if Torch < 75.
- +18% Bleed Application if Torch < 50.
- +16% Effort received.
- Decrepit Tail Feather :
- +4 Speed.
- +33% Disease Resistance if Torch < 75.
- +18% Bleed Application if Torch < 50.
- +16% Effort received.
The truth is that I don’t like them too much in general. The case can also give us one of those minerals that are sold for a lot of money.