 by
by We continue with the next boss of Souldiers and this time we will first face Brigard (aka the plugged in, because to be a commander he is too inept in combat), who is being controlled by those purple balls. Luckily this part will be quite simple since again this one will show us his unfortunate combat skills.
The fact is that as a novelty in this boss we have that just after defeating Brigard we will also have to face Sangrigor and this Valkyrie (it is the one that was corrupted) will represent a somewhat greater challenge. Anyway… I’m telling you, the combat isn’t too complicated despite being one boss after another. Oh, and when you defeat Brigard the state of the game will be saved and if you die in Sangrigor you can try again by skipping Brigard in the same state you entered this battle.
LOCATION OF BRIGARD AND SANGRIGOR
It does not have much mystery since we will find them after defeating Captain Birk in the Floating Module (the alien area). After this, Euder will take us on the back of his unicorn/pegasus/pony and we will fall into the house of that poor furry who I think is a fox (what a nice guy, really, we break the roof and he says that it doesn’t matter what fixes without problems, a big one).
Anyway, after leaving the house, save the game (you have a save point right there) and stock up on Balof’s machine for the battle that awaits you. I didn’t save and for whatever reason I had to leave the game after the first few tries and when I came back I found myself having to beat Captain Birk again.
Since this time we have 2 bosses in a row, we are going to see each of them separately and in order:
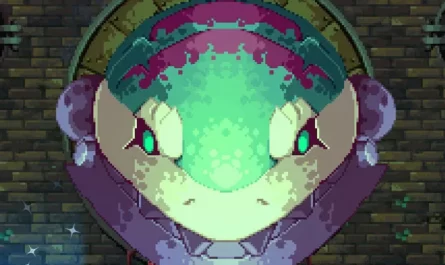
BRIGAND
The fight against Brigard will be quite simple and the idea will be to take as little damage as possible to be in the best possible state for Sangrigor . It will be enough to dodge him (he does not have too dangerous attacks nor does he have too much life) and hit him, but let’s see his attacks above him anyway:
- Double Slash : A single hit with your Greatsword followed by another. It’s easy to get behind with a dash to hit him later.
- Charge : Typical charge attack, with very little range for what we are used to. You can dodge it with a dash or jump and then hit it a bit.
- Empty Jaws : Will launch one or more jaws forward, a fairly slow basic ranged attack, easy to dodge. The only thing is that at the end of their journey they will leave a ball of pink energy on the field that we must avoid in order not to receive damage.
- Red Blow : It will jump and launch itself to the ground performing a blow and later a pink explosion. Remember that red attacks can’t be blocked, so dodge it (the explosion has a short range).
If for whatever reason you defeat him but end up in a very poor state of health and without potions, it is better that you restart the fight again or else Sangrigor will be practically impossible to defeat (when you die in Sangrigor you hit Load Game).
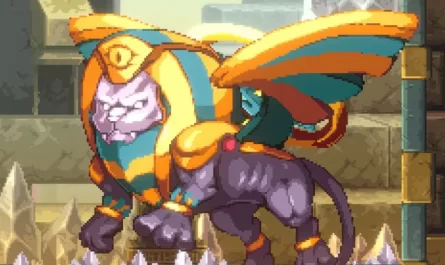
SANGRIGOR
This one will cost more than Brigard, but except for the final phase it’s not that difficult either:
PHASE 1
Let’s take a look at his attacks:
- Little arrows : He will shoot us some little arrows that take little damage but as he throws several if you eat them, he deletes. Dodge them as much as you can, it’s easy for him to hit you loose but try to get as few as possible to hit you. If you see him well you can attack him a little between you dodge.
- Charge + Yellow Strike : The best time to attack him. He will drop to the ground, perform a charge that you must jump (I recommend the double jump) and after that he will charge an attack in which he will launch a lightning in both horizontal directions. What I did was dodge him with a double jump, heading towards where I should more or less finish the charge to make another jump later to finish with an aerial attack (with the Scout this, with the others improvise with what you have) and let him do it. eat just after finishing said attack, which is quite fast. After this it will quickly fly again.
Between doing nothing and trying to hit him, it will cost him because he moves a lot and teleports, but it all adds up.
PHASE 2
The phase begins when you lower 25% of his life and in fact in this it is easier to damage him:
- Trapping Circle : You will see that a purple circle will appear on the ground that will chase you, you will have to avoid being in contact with it because after a while some kind of crystals will emerge that will trap you and meanwhile Sangrigor will riddle you with arrows. The good thing is that while he performs the attack he stays still and you can take advantage of it to hit him a lot between what you watch so as not to be caught by the circle. It sounds complicated, but it is not, the circle moves slowly.
In this phase he will also launch more arrows than in the previous one.
PHASE 3
It will enter this phase when its life is half, it maintains previous attacks and these 2 new ones are added:
- Disk + Arrows : He will launch a Krillin-style energy disk at you that you must dodge, but be careful because he will also launch arrows at you and the disk tricks you into eating the arrows. At the end of the attack, he usually finishes off by launching more arrows. At the end of the whole attack you can hit him a little (a little but something is something).
- Red Blow : A version of the charge that it made when it was placed on the ground, but being more powerful and with a greater range, as well as being a red attack, it cannot be blocked, so you will have to jump yes or yes. Very easy to dodge anyway.
PHASE 4: BULLET HELL
When his life is at 25% and until he dies, it is the phase that really has difficulty and it will be very easy to die in it. Acquire these 2 new attacks and both are very dangerous:
- Bullet Hell Vertical : It will start shooting arrows down like rain for a long time, here forget about attacking, focus on dodging. The best thing you can do is stay static at one point and only move a little in case an arrow is going to fall right on you (the worst that can happen is that just at that moment another one is going to fall where you are going to move, something that happened to me once, but by doing this you will avoid almost all of them); after this you repeat the strategy (static, spike falls on me, I move a little and we repeat).
- Bullet Hell Horizontal : Like the previous one but horizontally, so you’ll have to jump in case one hits you at ground level. You go to the other side of the screen and the same strategy, you stay still and in the event that an arrow comes at ground level, you jump it carefully from the ones that come next since returning to the ground might not be so easy ( resort to the double jump, aerial das… etc).
I think it goes without saying, but save your weapons for this phase so it drops quickly.
REWARDS FOR DEFEATING HIM
Again you won’t get anything for defeating both bosses, which is also again a tremendous F.