 by
by Elden Ring sees us continue our adventure, and after hurting the bosses of Liurnia Lacustre , we now go east from Sepolcride, arriving at the red lands of Caelid , but not only! In fact, in this guide we will propose the bosses of the aforementioned Caelid and Dracotumulus (which in a certain sense is part of Caelid). We remind you that if you are struggling with some of the aspects concerning Elden Ring , our guide to trophies and platinum includes everything that can be useful, but also guides to the bosses of the other areas of the game, such as that of the Peninsula of weeping. , of the earlier Sepolcride, or underground areas . If you have not read it, we also refer you to our review of the game.
Before continuing, we thank the Powerpyx portal for making their demonstration videos available to the public, some of which are shown there to show certain bossfights.
ATTENTION: we remind you that being a guide to the bosses, you may receive unwelcome spoilers about what awaits you in the areas of Caelid and Dracotumulus of Elden Ring, so we invite you to proceed in the reading aware of this.

The Bosses of Caelid
Magma Dragon – Medium (with a level above 60)
You will meet this boss at the end of the Gael Gallery dungeon in Caelid. Before entering the boss room, we advise you to open the other door next to it and go to unlock the point of Grace that will take you back to the back of the gallery, to the other entrance that overlooks the East Sepulchrid.
If you have already fought against the Magma Makar Dragon in Liurnia Lacustre, this will be slightly easier for you, as it is identical and does not have phase 2 of the other. However, the area in which you will fight is very narrow, so you will have to dodge very well, and maybe take advantage of the usual invocations with the ashes. Like Makar, the boss has a lot of life, so you may need to use mechanics like poison, scarlet rot, or bleeding to come to your aid and end the fight faster to avoid getting stuck. The Knights of Godrick are a good choice for invocation.
If you kill him, you will get a Dragonheart , the Moonlight weapon and 7,500 runes as a reward .
Putrescent Avatar – Easy
You will meet him in the area of Caelid closest to Sepolcride, as always under a minor Mother Tree .
If you have already fought against the other Avatars that we have proposed in the guides of Sepolcride and Liurnia, for sure you already know how to deal with it, since despite the different name and the more “scruffy” aspect the patterns and strategies are identical. The only difference is the ability to inflict scarlet rot status , and the location, which will limit your wiggle room a bit (but will provide cover from its magical attacks). Keep your distance and the juice won’t change. Before engaging, we recommend cleaning the area from the various enemies present, which can be really very annoying.
If you defeat him, you will get the Pyrogreen Crystal Tear , the Broken Tear of the Veil of Flame and 9600 runes as rewards .
Crazy Pumpkin Head (Hammer) and Crazy Pumpkin Head (Scourge) – Easy / Medium (with level 60 or higher)
It is located in Caelid, in the Caelem Ruins . This is the first double boss featured in this Elden Ring guide dedicated to Caelid.
You already know these metal-headed monsters, even as simple mobs encountered in the game world, with the small difference that this time they are 2 for the price of one, and they will have weapons ! Fight them as always, and as soon as you step into the fog reestablish parity / numerical superiority with a summon, as you will need support and the room is quite small. Dodging a lot, try to take advantage of the openings granted by both after their attacks.
If you defeat them you will get 6300 runes as a reward , and in the chest beyond the door you will find the Shield of the face .
Mother Tree Burial Guardian (Scepter) and Mother Tree Burial Guardian (Sword) – Easy / Medium (at level 60 or higher)
Right below the lesser mother tree where you just defeated the Avatar are the Catacombs of the mother tree . This double boss is at the end of the intricate dungeon.
Dealing with this type of boss when he is in the company of numerous minions is really annoying, and it will be so even when there are two big cats in front of it . In this case we are faced with a Guardian with the scepter, who will make blunt and magical attacks , and the other with the sword that we know well. Fighting them at the same time will be a bit tricky, especially because if you are not too high in level, you will suffer a lot from the numerical inferiority . So use a not too squishy invocation (the Soldiers of Godrick are a good choice) to equalize and / or overcome, and try to concentrate and quickly kill one of the two , so that you can end up, badly, in a 1vs1.
The strategies for fighting are the same for the others you have encountered so far, whether you are melee or magic build.
If you defeat them you will get the Ashes of Crazy Pumpkin Head and 7400 runes .
Fast-paced Duelist – Easy
You will find it in Caelid in the Cavern of Gaol .
Virtually identical to the Dueling Burial Guard we defeated in Sepulcris, however it will be armed with a large double ax rather than hammers. If you can keep a good distance (the size of the arena allows it), with magic you can easily keep it at bay , while if you opt for a hand-to-hand combat, try to read its movements carefully and learn how fast it is. ax impacts, as it could inflict great damage, even with the shockwave at close range. Remember that it can also go into anger mode .
If you defeat him, your reward will be the Ashes of a rotting corpse and 6700 runes .
Video of the upcoming fight …
Swordswoman Nox and Monk Nox – Very easy (level 60 or higher)
You will find them in Caelid, in Sellia, the city of witchcraft . After you light the three braziers on the city towers, the magic portal that blocked the great access to the west edge of the city will also have dissolved, unlocking the bossfight. This is the third double boss that we find in this Elden Ring guide dedicated to Caelid.
These are two not too irresistible enemies, whose name already explains half of the threat. They will attack rather tightly and combined, however being humanoid and lightly armored enemies, they will take a lot of damage if faced after you pass level 60. The only thing to do is to equip yourself with an invocation ash that restores numerical parity ( or that puts you in superiority). Face them however you want, there are standard enemies far more dangerous.
As a reward, you will get 6400 runes and the Shining Sword from Nox , while just behind it, in the chest, you will find the Lusat Stone-stone Staff .
Commander O’Neil – Medium (at level 70 or higher)
It is located in Caelid, on the banks of the Aeonia swamp to the north, at the point of Grace of Inner Aeonia . This boss has an important item that you will need for the Millicent quest.
An all-in-one commander, very tough and annoying. As soon as you start the fight, he will summon soldiers around him (5 to be exact, mixed among those who will attack you with swords and crossbows). Your task first of all is to neutralize them (perhaps while you are running on horseback, since you will be in an area where it is allowed to use it), and only when you have done so we advise you to take advantage of some evocation as always. Attention, having reached less than half life, he will summon 3 minions again , but this time they will be equipped with a large ax, and who will inflict copious damage if they hit you, try to get them out of the way quickly to concentrate on the Commander.
If you play from a distance you won’t have too much difficulty, as the Commander’s attacks are limited to melee and clouds of scarlet rot. If you have magical builds , a large part of the task will be using magic, dodging and summons to get rid of the minions and the rest will come by itself (although one of his rotting attacks has a very large radius, so always try to keep a safe distance ).
With melee builds you may have a few more problems: same story of the minions, plus always try to recognize when he is about to attack with rot to get away as soon as possible from O’Neil, while the rest of the physical attacks will be quite slow and readable. Try to hit 1 or 2 at a time without taking too long combos, and be careful when he will charge with the spear.
Defeat it and you will get 12,000 runes , the Commander’s Banner weapon and the Pure Gold Needle key item .
Rotting Knight (spear) and Rotting Knight (sickle) – Easy / Medium (level 75)
This is the dungeon boss of the Abandoned Cavern , which you will find in Caelid. It is a short but extremely uncomfortable dungeon, which will see you walking in a rotting swamp, and with enemies capable of inflicting poison. Equip yourself with boluses at will before entering. This is the fourth double boss we meet in this Elden Ring guide dedicated to Caelid.
You already know the type of enemy, as you have faced one in the Wailing Peninsula, and the swamp is teeming with these treacherous fighters. However, meeting two together could be a problem for some, especially if you use the magical build. As usual, focus on killing them one at a time. One of the two will be stationary in the center of the arena, the other will arrive shortly after, but even after his arrival continue to beat the first enemy . You have to be very careful about magical attacks (the barrage spears that protrude from the ground, and the rotating sickle for the other. For both types of approaches, melee and magic, we recommend establishing numerical paritywith the invocation of an ash (the Soldiers of Godrick are always a legit choice). Always be on the lookout for rotting puddles that will inflict rot, so watch where you put your feet.
If you defeat them, you will get the very useful Golden Scarab amulet and 7,000 runes .
Decadent Ekzykes – Medium / Hard (level 80 and above)
South Caelid Highway, near the southern Caelid Highway Grace point .
It is a dragon boss very similar to those encountered so far (we are talking about the flying variant, different from magma dragons). The most complicated thing to manage will be the scarlet rot, which in dragon will be able to inflict you with a toxic cloud, with more than one move.
Face it on horseback , necessarily, whatever type of build you have. Beware of rot and keep your distance with the magician, spam a lot of quick and precise spells. With melee attacks you will necessarily have to concentrate on the legs, but always be ready to flee and move away quickly (practically, you will have to carry out a strategy to “elastic”). Be careful, because being clouds, they often also go beyond walls, so it won’t be much use trying to take cover behind walls or objects . As always it’s a drag warfare with dragons, so keep your concentration level high, avoid physical attacks too, and you’ll slowly bring him down.
Your reward consists of 38,000 runes and a Dragon Heart .
Night Knight (5) – Easy (level 75 up)
You will find it in Caelid, following the highway (Southern Caelid Highway Grace point) since you encountered the decadent dragon Ekzykes, as usual it only appears at night . This is the first night boss that we find in this Elden Ring guide dedicated to Caelid.
By now you should know quite well the type of enemy, you can fight him on the ground or on horseback. In this case it is another Knight armed with a scourge , like the first one we met. Clearly he will be tougher and deal more damage, but nothing that you won’t be able to handle if you behave as usual. Try to face it when you have reached at least level 75 to have a fair challenge .
Defeat him and you will get 8500 runes and War Ash: Poison Flight as a reward .
Cemetery Shadow (3) – Medium (level 70 and above)
You will find it in Caelid, at the end of the Catacombs of Caelid dungeon .
Like the other cemetery shadows , but with the highest statistics for the area they belong to. Be careful not to get too tired from the dungeon (luckily there is a statue of Marika to the rescue, in case you fail on the first attempt).
The excellent reward, in addition to the runes, consists in the Ashes of seugage of the rot .
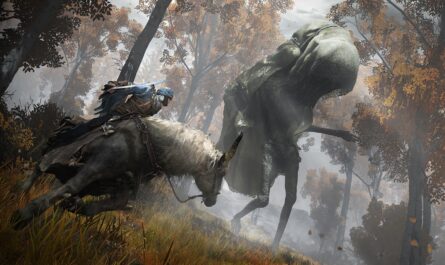
Meteorite Beast – Medium (level 75 and above)
You will meet her as the boss of the Sellia Crystal Gallery dungeon . Try to deal with her when you have reached at least level 70. If you are below her, it will be very difficult.
It is a rocky beast with the features of a bull, defended by a leathery armor. Its attacks are a mixture of charges and physical attacks , combined with gravitational magic , with a fairly wide and annoying range, especially if we consider that the arena in which you will fight it is very small . The final problem is that it deals a significant amount of damage .
Dodging is the watchword for this boss, who if he hits you once, you will hardly miss the second, almost certainly putting an end to the encounter. The wizards will have their work cut out, because they will be caught up quickly even if they play from a distance. The Beast has wide-ranging gravity attacks, so move away to the other side of the arena when you see the ground glow purple.
A good opening to hit her in the head is after she fires the laser, so current to her left when she uses it. As usual, based on the build and the situation, we recommend taking advantage of the summons, but know that if they are not upgraded to at least +3, they will have a very short life.
If you defeat it, you will have a rich reward: 7600 runes , a funeral forging stone [6] , 5 forging stones [7] , 10 gravity stone blocks , and the Miner’s Ashy Orb (funeral) [1] .
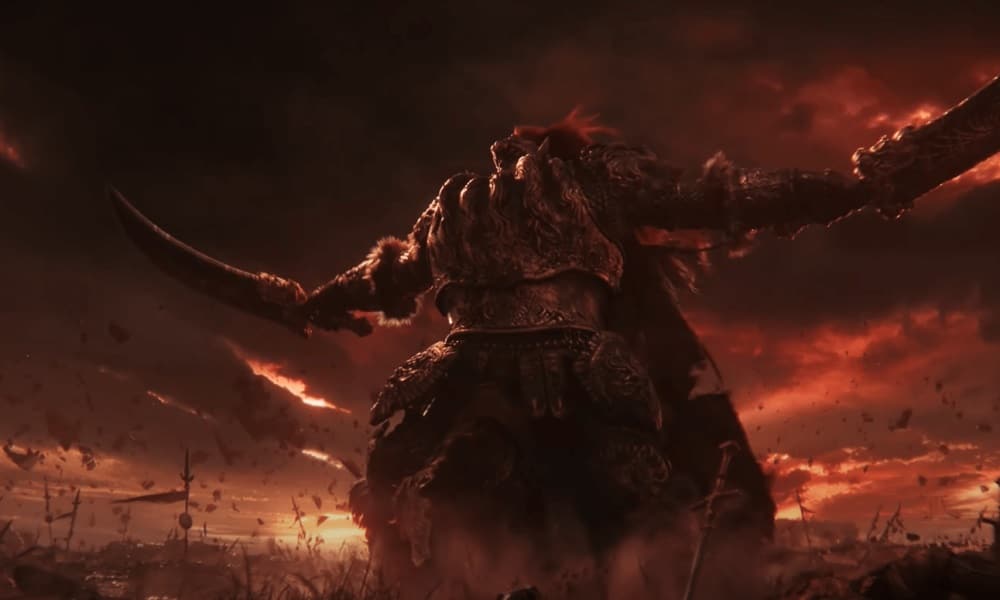
(TROPHY & BOSS STORY) Radahn the Celestial Scourge – Hard (Recommended at level 70 or higher)
You will find it in the southernmost part of Caelid, first taking the teleport from the bridge to get to the Mantorosso Castle (shortly after the point of Grace of the bridge). Go past the castle, talk to the NPC to start the “Radahn Festival” and it will become night. Go to the elevator to go down to the beach and start the fight.
It is one of the fights that have become a symbol of Elden Ring. In a huge sandy area, you can summon other fighters to your side to help you, although many of them will be short-lived due to the strength of the enemy. Their job will be to keep Radahn busy for a few moments while you do other things (be it cast, summon, heal, attack, etc). His attacks on him are many , annoying and very often unpredictable , but above all some of them could kill you with a single blow . For this reason, you may have to opt for remote tactics.
In the very first phase he will attack you from afar with his bow , so dodge the arrows at the last moment (they are tracers) and get closer as you go . When you are close enough he will pull out the swords , and you can start using the horse to be faster. Be careful not to get hit by the swords while you are on horseback, otherwise you will be stunned and killed with the next blow. In the meantime, keep summoning allies, always, as soon as you can .
When you have taken a quarter of its life, it will begin to give the gravity element to its attacks, making them even more lethal, from tracer hits , waves of blades , to then arrive at half life with meteors and jumps that will make you lose it . of sight . Try to run at full speed to dodge the attacks, because it won’t give you a break, and double jump to avoid for the gravity blades (the purple ones). The more it takes damage, the more aggressive it will become, adding gravity attacks and varying.
There are a couple of ways to be able to fight it more easily , such as inflicting scarlet rot with the breath purchased at the Church of the Draconic Communion, however you will always have to be good at dodging and not getting hit. Yes, luck will also serve .
Needless to say, Radahn possesses a lot of life , so the entire fight will be a test of endurance and patience. Good luck.
If you manage to defeat this powerful boss, you will get the Radahn Greater Rune , the Remembrance of the Celestial Scourge and 70,000 runes as a reward .
Rotten Tree Spirit – Medium (at Level 85 or higher)
You will find it in Caelid, in the Catacombs of the fallen in war . To reach them you must have already defeated Radahn, otherwise the place will not be accessible.
Same patterns and tactics as the Ulcerated Tree Spirit you faced in Sepulcride. The only difference, other than the fact that the dungeon is truly infamous and will inflict altered statuses on you all the time, is that it will be stronger in the stats . The good news is that the arena you will fight in is wider than the one in Sepulcride, so you will have more breathing space and can dodge better. Make use of summons as always, whatever your build.
If you defeat him, you will get a Golden Seed , the Ashes of Ogha, Red Mantle Knight , and 64,000 runes as a reward .
Bird of the Death Rite (2) – Medium / Hard (level 75 and above)
You will find it in Caelid, near the road, continuing east from the point of Grace of the Southern Highway of Caelid . Attention, it only appears at night .
Cursed, treacherous and lethal, it is the copy of what we faced and hated in Liurnia Lacustre. This time the location is different and you may have a little more breathing room, but its stats will be slightly higher. Usual story with approaches, with attacks at a safe distance much preferable to stay safe. Remember to use a frost-resistant build, or its hits could soon become lethal.
Defeat him and you will get the Death Poker weapon and 15,000 runes .
Aberrant Warrior and Crucible Knight – Hard (at level 70)
You will find them in the lands of Caelid, in the Mantorosso Castle . You will encounter them if you enter the castle normally before activating the portal, or after entering through the portal and defeating Radhan, and after talking to the NPC at the end of the castle, and then reloading the area. They will be in the central square of the castle, the one where you talked to Alexander and Blaidd before the fight with Radhan. It is one of the most difficult double bosses that you will find in this guide dedicated to Caelid and Dracotumulus.
First you will find yourself fighting against the Aberrant Warrior alone, who after less than a minute will be joined by the much more tough Knight of the Crucible (variant with the tail). As long as you are 1v1 it could be fair enough, if you have already learned to fight with this type of fair, however the arrival of the Knight will unbalance things exaggeratedly to your disadvantage.
First, the advice is to do as much damage as possible to the Aberrant Warrior before the other enemy arrives , as he will take more damage and you can focus on him. To make this more feasible, use a summoning of ashes , perhaps they have good health , resistance to damage , and are composed of more than one unit (the knights of Godrick are a good alternative, but bring them at least to level 4 ). The difficulties will be great both if you play melee, and if you fight from a distance, especially since both enemies, especially the first, will attack you headlong, cover the distances to attack you, and you will have in the middle of your feet.dozens of destructible objects that will often get in your way . If you are quick and wipe out the Warrior as soon as possible, even if you have been caught, then try to fight the Knight of the Crucible as usual. A good idea could be to inflict altered statuses, even if it takes a while to take root (if the summons are still alive, take advantage of the moments when he is distracted by them to attack him repeatedly).
If you defeat them, your reward will be 16,000 runes and the Greatsword of the Ruins .
Decaying Crystallian (Staff), Decaying Crystallian (Spear) and Decaying Crystallian (Circular Blade) – Medium (at level 80 or higher)
You’ll find them in the lands of Caelid, at the end of the Sellia Retreat dungeon , just north of the Pestilence Church. You will have to hit a rock to discover a secret cave (illusory wall). There will be an annoying wizard in the same area, the wall is the one behind the wizard and beyond the tombstone.
These are the crystallians that we have come to know, but with the small inconvenience that there will be 3 at the same time , and that their blows are able to inflict the Rotting . It goes without saying that dodging will be more important than parrying.
Deal with them as usual, call on a leathery ash to help you if you find yourself in trouble, and use weapons with impact damage to do much more harm. The good thing is that compared to pure crystallians, these are less aggressive and slightly more passive, sometimes giving you time to hit them undisturbed one at a time. As always, try to kill one first, then move on to the other. We recommend starting with the magician , much more annoying from a distance, and then moving on to the lancere and so on to the third.
If you kill them, you will get 7600 runes and the Crystalline Torrent sorcery as a reward .
Greyoll’s Dracotumulus Bosses
Hugues Warrior Mage – Easy (level 80 and above)
You’ll meet him in Sellia’s Eternal Galley in Greyoll’s Dracotumulus.
It is a wizard like the one you first encountered in the Raya Lucaria Gallery, and is capable of attacking with powerful magical attacks both at range and up close with summoned weapons. The best way to fight it is not to let it breathe , so players with melee builds (whether it’s strength or dexterity) will have an advantage., even being able to finish the match without taking damage. This will be possible by alternating heavy and charged attacks in order to often stun the enemy, and also expose him to critical attack. Mages will have a little more to do and won’t be able to rely on horses or summons, so they’ll need to be good at dodging often and landing as many attacks as possible.
If you defeat him, you will get the Hugues Warrior Summoning Ashes and 7800 runes .
Farum Azula’s Human Beast (Greatsword) and Farum Azula’s Human Beast (Throwing Knife) – Easy / Medium (at level 85 or higher)
It is found in Greyoll’s Dracotumulus, inside the Dracotumulus Cave . This is the first double boss you will find in Dracotumulus in this Elden Ring guide.
As you will understand as soon as you arrive, the two enemies will not immediately notice your presence , so it is legitimate to take advantage of the surprise effect with an attack from behind . As always for double bosses, there is the advice (or almost I would say the rule) to get rid of one of the two as soon as possible. With less stamina and less life, you might start with the Beast attacking you with the Throwing Knife . If you want to re-establish numerical parity, use an invocation, but if you get rid of the first one in the opening bars, you hardly need it. Try to use a lot of critical and stun attacks, perhaps with jump or charge attacks.
If you have a melee build try to quickly close the spaces with the Beast with the knife and hit hard, and then face the other individually with the broadsword by dosing attacks and dodging as you now know how to do. If you have magical builds, for sure you will need to keep the beast busy with the broadsword, which if you are alone will charge you without too many compliments, so in your case the choice of the invocation of the ash is obvious.
If you defeat them, you will get the +2 Fire Dragon Talisman and 65,000 runes .
Decaying Avatar (2) – Medium / Hard (at level 95 or higher)
You will find it at the foot of the Lesser Mother Tree in Greyoll’s Dracotumulus.
It is nothing more than the usual avatar, but like the one you met in Caelid, it has attacks that can inflict rot, and with a lot of extra life. When he is less than half his life, he will start spamming attacks with light swords. Fire always remains a good ally. Deal with it as you have dealt with all the avatars so far, but remember to get to an adequate level, otherwise a single attack can wipe you out.
If you defeat him, you will get 91,000 runes , the Sharp Crystal Tear and the Opalescent Solid Tear .
Greyll Flying Dragon – Medium (melee) – Very easy (ranged) (at level 85 or higher)
You will find it at Dracotumulus of Greyoll, in the area of the two bridges, exactly on the big bridge .
It is on an aesthetic level and for some moves of a dragon like the other fliers we have encountered. The difference is that it will almost always stay on the ground, it will not fly away, at most it will rise and then attack (with flames or claws), but always and in any case remaining on the deck . This implies that there will be less space to attack him while on horseback by circling him like the other dragons in the various arenas, but if you are fast enough and reach his wings while avoiding fire, you will have your fair share of free shots. Thus, there are two ways to take down this dragon, one of which is much less “fair”.
The first is to face him like a brave knight at his feet , dodging at the right time and trying to avoid the flames, despite being a fairly risky mode. In this case, try to always stay behind him, go under him to avoid flames in flight or jump attacks, and clearly pay attention to paws and tail. If you are at level 85 it might take a little patience to knock it down, but it’s more than doable.
The other way is to attack it from a distance , climbing up the rocks on the side of the bridge (on the side of the Ferino Sanctuary): the dragon will continue to attack in a vacuum and will not hit you, always remaining on the bridge. Use magic to spam attacks if you are a wizard, or use a bow after getting a lot of arrows. To do more damage and take less time, some invocations with the ashes manage to hit the dragon from a distance.
If you defeat him, you will get 80,000 runes and a Dragon Heart .
Night Knight (8) – Medium (at level 85 or higher)
You will find it at Dracotumulus of Greyoll, in the area of the two bridges, exactly on the small bridge , it will be easier to reach it from the Point of Grace of the spire. ATTENTION: it appears only at night like all the others present in Elden Ring, advance the time and then reach the designated place.
This Night Knight is armed with a halberd. He has more life than the others and deals more damage than the others, but otherwise he is still the same boss. Deal with it as you already know, and be careful not to take too much damage. If you are exploring and facing it from below level, take advantage of the scarlet rot to damage it slowly while you continue to inflict attacks on it (physical or magical).
If you defeat him, you will get 42,000 runes and War Ash: Limier’s Pass .
Ashen Globe Hunter (4) – Hard (at level 95 or higher)
You will find it in Dracotumulus of Greyoll, in the Lone Merchant’s Hut . Like all the other bosses of this type in Elden Ring, and the only one in this guide about Caelid and Dracotumulus, this Hunter will only appear at night.
The space around the hut is littered with giant, aggressive mutt. Try to take them out before starting the fight. Take on the hunter as usual, but know that you must have a good level not to die after a single hit. Take advantage of the horse, attack from a distance (even the roof of the hut if you want), and always be ready to dodge.
If you defeat him, you will get the Stone Walker Orb and 50,000 runes .
Follower of the Black Blade (2) – Hard (at level 100 or higher)
You will find it in Dracotumulo di Greyoll, precisely in front of the door of the Ferine Sanctuary . This is the same type of boss you encountered on the Giant’s Peak, one of the most powerful in the entire area of Caelid and Dracotumulus of Elden Ring that you will find in the guide.
This is a boss who, if faced prematurely, will kill you with one blow. Try to face it only when you have reached an adequate level. Like the other gargoyles you have encountered, he possesses varied attacks, heavy airborne attacks, charged attacks, and so on. In addition, he has 2 weapons , which he will change during the fight, modifying some patterns. Your build will make a difference in your strategy, especially when it comes to the defensive phase . If you have a shield of the big ones and a good dose of stamina, you can risk parrying his blows, while the blows imbued with magic are convenient to dodge them with deafult.
With magical builds you try to keep your distance, and with melee builds, study the timing of his attacks well to alternate hits and dodges. In both cases, an evocation could come to your aid , perhaps Latenna the Albinaura, placed at a distance, which will provide you with support with her arrows and without becoming the target of the gargoyle.
If you defeat him, you will get 88,000 runes , the Black Sword of the Gargoyle and the Black Halberd of the Gargoyle .
Sacriderm Apostle (2) – Hard (at level 95 or higher)
You’ll find it in Greyoll’s Dracotumulus, inside the Divine Tower . The grace point is Divine Tower of Caelid: basement , so you will have to go down once you enter. This is the boss who in this Elden Ring Dracotumulus and Caelid guide will give you more runes once defeated.
Again, if you don’t get to fight bosses with an adequate level and amount of HP, it could knock you out in a hit or two. It is a very difficult enemy, with very varied attack patterns , and with a challenging range to manage, if we also calculate that the arena is not very large. He will attack you with a long curved blade, which if necessary will also rotate; also he has magical attacks with which he can hit you from a distance. He does not end there, because when he has lost about half of his life, as if the distance reached by his blows is small, he will even begin to stretch his body and make strange movements, so as to reach you in an instant.
If you have a magic or ranged build, try to keep away and if you can use a summon. If, on the other hand, you are a melee player, you will absolutely have to study his attacks, trying to dodge and re-enter the openings he will grant you. During its second phase, your attention will also need to double.
If you defeat him, you will get 94,000 runes and his set: Sacriderm Apostle’s Hood , Sacrederm Apostle Vest , Sacrederm Apostle Vambraces , and Sacrederm Apostle Pants .