 by
by Well, we continue with Loop Hero , this time with Expedition 2 which, as logic dictates, is more complicated than the first. It must be said that this one in particular has cost me its own, as the jump in difficulty has been very noticeable… Will it continue to climb at this level?
The bases of the game are the same and we are still the ones who decide which enemies are the ones that appear to us, as well as our build, cards and all that… but there will be a series of new power-ups for the enemies that are quite silly ( and the new boss, who is much more sucker, of course).
But nothing, that is precisely why I bring you this guide, you will see how it works for you. Let’s go there!
📘 DETAILS OF EXPEDITION 2
Let’s start with some general information about Loop Hero Expedition 2:
- Enemy Skills: 1-2.
- Enemy Strength: 0%.
- Enemy Strength Increase: +3% per loop.
- Maximum Quantity of a Resource: 20
Personally I think it’s the skills part that stands out the most. In Expedition 1 the enemies could have between 0 and 1 abilities, so many times they didn’t even have them. In this Expedition forget, they will always have at least 1, and with bad luck 2, which is obviously worse (they are pretty darn).
For the rest, it is also noticeable, at the end of the day, the enemies already have 5% more strength (in the first one they had -5% and now it is 0%), which seems not, but there are many enemies at final… and as above these will also obtain 1% more strength in each loop (in the first Expedition it was +2% strength per loop), because you end up noticing fabric that hits harder. But I’m telling you, the worst thing is the skills issue .
🃏 RECOMMENDED DECK AND TIPS
Since this is already the second expedition and you probably already have all the classes unlocked, we are going to make a change of approach. I’ll tell you which cards I consider to be practically mandatory no matter what class you’re taking, and by the way, I recommend you also take a look at my Loop Hero builds to get a better idea of how you should use each class (at the moment I only have the Warrior one , but soon I’ll bring the others).
- Path Cards (Line 1):
- Grove : Spawns 1 Loborrata every 2 days. We want it especially in order to also use the Blood Grove card, which is tremendous.
- Graveyard : Spawns 1 Skeleton every 3 days.
- Village : We heal 15 + 5 x Loop when passing through there and they will give us a mission (an enemy will appear in a more powerful version and when we return to the Village they will give us some nice equipment as a reward). If you go with the Rogue, I do not recommend them so much.
- Wheat Fields : They can only be placed next to the Villages, but they will increase the healing that they do when passing through there. It will also spawn a Scarecrow (an enemy scarecrow) every 4 days, but come on, they’re not that big of a deal and it’ll be more xp for us.
- Path Cards (Line 2):
- Spider Chrysalis : Spawns 1 Spider in an adjacent square each day. Very good enemy to go farming xp, I always wear it.
- Battlefield : This one is a joke to get equipment, but if you go with the Rogue class it is not worth it (he gets the equipment in another way, I will tell you in his build). Never put 2 close.
- Bloody Grove : It can be placed next to other trees (such as the Grove or Forest cards and others). It will annihilate enemies in the area that have 15% health or less (it comes in handy, one is mandatory in the boss area, which is always at the campfire).
- Outside Cards (Line 3):
- Rock and Mountain : They will increase our PS, the idea is to put them together because they enhance each other. If you place 9 forming a 3×3 you will create a «Mountain Top», which will give us a lot of health (you can only have 1) with the drawback that a Harpy will appear every 2 days. They are annoying, but come on, it’s worth it and a lot.
- Prairie : Heals us 2 HP at the beginning of each day. It will be 3 if it has any building or structure attached to it. Whatever it is, if it has something next to it that isn’t a Meadow, it gets boosted.
- Forest and Thicket : You may not have it yet, it is obtained by building the Forest (it has to have the Information Center). I did it without them, but come on, if you have them or want to farm to have them… just do it because they are phenomenal. They will increase our speed when attacking, something that always comes in handy but especially in this case because of how the boss in this area works (who is called Priestess, below you will have his guide).
- Special Cards (Line 4):
- Oblivion : Eliminate all enemies and structures in a square. It is great to go loading the Goblin Camps that will appear when you put Rocks and Mountains or the “A Village?” that appear when adding Forests and Thickets.
HOW TO BEAT EXPEDITION II
Surely it will take several attempts, it is what it is, it is not easy; but nothing, you know, to be filled with determination, that surely you have achieved even more complicated things.
Anyway, I’ll give you some tips:
- This time the Warrior didn’t suit me so well, I did much better with the Rogue (with the Forests and Bushes even better, which I then continued playing and cloth). Obviously you can go with any class you want, but I tell you what works for me and I think the Rogue is amazing. If you want to unlock the Rogue, you will have to build the Shelter.
- It is very important that you have the Herbalist Hut, even improved (the more, the better). The obligatory Lyceum also to be able to have Traits (you would have to have it already from the first expedition, but I will tell you the same).
- This time you don’t need to save the Oblivion cards for the boss because he doesn’t create buildings that boost him like the Lich did; so spend them as you please (for those damn Goblins for example).
- The Villages and Battlefields will help us a lot to equip ourselves better, essential (with the Rogue I do not recommend them so much).
Following these tips and those already mentioned above you will see how it is much easier to achieve it. Let’s go now with the boss.
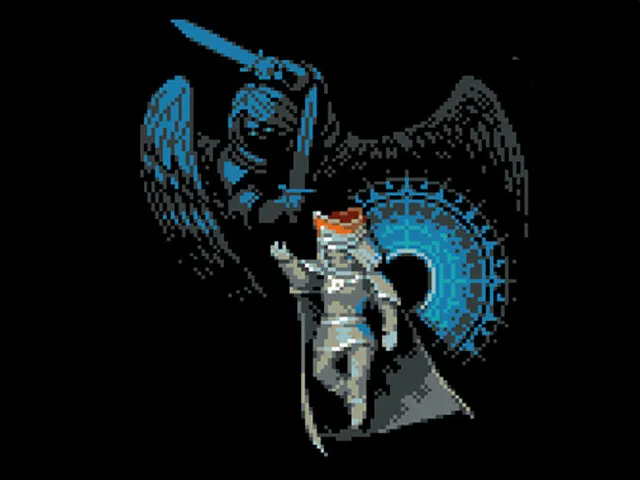
💀 HOW TO DEFEAT THE PRIESTESS
The Priestess is the boss of Expedition 2 and the truth is that it is a rather complicated boss. In fact, it’s easy to come up with a relatively powerful character (up to that point you’re doing well) and still defeat you.
Let’s take a look at his abilities:
- Heavenly Will: It will summon an Angel that will disappear after making 2 attacks on us.
- Iconostasis: Every 2 attacks will create 5 stained glass windows, each of which has a 20% chance to absorb your attacks and die in the process.
You can’t attack the Angel, he just appears, launches a couple of attacks at you and disappears to come back after a while and so on. He is the one who will be causing us harm. Meanwhile, the Priestess will create the stained glass windows to protect herself from your attacks, which is what really bothers this boss a lot.
The key to defeating him is to hit very quickly, to get rid of most mirrors quickly and have a greater chance of hitting the Priestess; they will constantly appear on the field, but you will also quickly get rid of some of them.
The Rogue comes in handy if you put a lot of Attack Speed into it , the Necromancer also if you go with multiple skeletons and also have some Attack Speed to quickly summon them when they die. The Warrior the same, if you go with him you see your Attack Speed increases. And of course, the Forest and Thickets cards come in handy for the same reason. I managed to get by with the Rogue without these cards, but now that I have them, it makes a difference.
Another recommendation that makes a huge difference is to have the Trait of (you can get it as a reward by defeating the Lich) Omicron Technique to revive with all the life when we are killed (it will only happen once, so you have to reach the Priestess with this effect still active).