 by
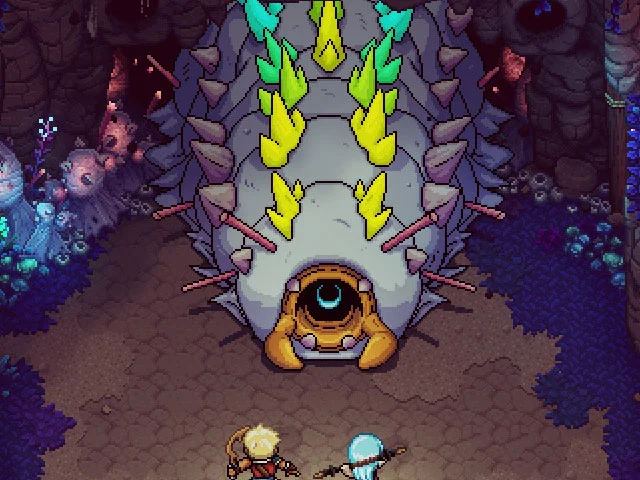
by Pringchief (tremendous name) is the second boss of Sea of Stars and this one is not at all like the first one (it was a tutorial boss, that’s what it is), this one does feel more like a real boss. That doesn’t mean that he is a difficult boss, but it does mean that he is somewhat challenging, let’s say, especially compared to the first one.
It is a kind of enormous worm that will summon, if we allow it (that is one of the keys to this boss, not allowing it to do that), some… poisonous ball bugs? In addition, it has a quite devastating attack (we see it below in the attack guide) that will put us quite on the ropes, although luckily at this point (as if we had a lot of game) we will have the “Restoring Light” Combo skill »; That’s going to come in handy for this boss.
And nothing, I stop making out as always and let’s go with the guide.
HOW TO DEFEAT PRINGCHIEF IN SEA OF STARS
We will start as always by seeing all his attacks with the best way to block/evade them and after this I will give you some more generic tips to make it easier to defeat him.
ATTACK GUIDE
These are all his attacks:
- Poison Launcher : He will spit poison at one of your two characters, he doesn’t have much else, you already know that his thing is to use the action button just when he is going to hit us to reduce the damage we receive. The attack doesn’t do much damage anyway. When the battle is more advanced, he will spit twice in a row.
- Acid Bomb Bugs (avoidable) : An attack that we can prevent from performing if we hit it with the types of damage that the boss has (those little squares) before it performs its action. If you can’t avoid the attack, it will summon a couple of “Bug Bosses” (they’re really called that, it seems like one of my invented names, but no) that of course will attack us and that I recommend that you eliminate using attacks that hit multiple enemies such as Zale’s “Solar Sphere” or Valere’s “Crescent Arc” and “Lunerang.” If you are out of MP for whatever reason, I do not recommend that you attack them with the basic attack because as soon as they attack you once (a very basic hit) they will die instantly and it would be a waste of 2 actions. When the battle is advanced it will be more difficult to avoid the attack because we will have to hit it 4 times to the types of damage that the boss gives us and on top of that it will summon 4 “Bug Bosses”, so be careful.
- Rockthrower (be careful with this one) : He will do it very rarely by lowering his life to certain sections. Basically some rocks will fall from the sky that will impact both characters, first one falls and then another falls, so you will have to block 2 times. This attack does do a lot of damage, so be careful. My recommendation is that you accumulate Combo points and use “Restoring Light” (it is a very powerful heal for the entire team) right after receiving this attack to heal quickly and be able to continue comfortably with the battle.
TIPS FOR BATTLE
More or less what I have already told you in the attack guide, there are 2 very important things that you must do to make this battle as easy as possible. Also, keep in mind that this boss is Vulnerable to both Moon and Sun damage , so we will lower his health a lot with our magic attacks.
- Prevent him from summoning the “Boss Bugs” : As soon as the signs with the types of damage appear, make sure to hit him with the relevant type of damage as many times as necessary, this way you will avoid him summoning the bugs. If for whatever reason you end up summoning them, quickly finish them off using area attacks (Lunerang is the most effective in general since it will work even if it summons 4 bugs, when it only summons 2 any one will do).
- Heal quickly after “Rock Thrower” : That attack deals a lot of damage and you want to heal quickly so that your characters are not in danger and so you can quickly continue the offensive. His thing is what I have already told you, saving Combo points to use “Restoring Light” when he makes this attack (which normally leaves both characters quite touched). It is better to invest the MP in the offensive, if it becomes difficult for you it is better to use Tomato Snacks than Zale’s cure.
REWARDS
This is what we will get if after defeating the boss we go into the dark cave that is right in front of where the battle takes place (where the boss comes from, let’s say):
- 60 Gold : The in-game currency.
- Adventurer’s Vest : Armor that you can equip to both Zale and Valere that provides 5 Defense and 5 Magic Defense (the game is poorly translated and Magic Defense is called “Maximum Defense”). If you explored this boss’s dungeon well, you should already have an Adventurer’s Vest in your inventory, so after this you can equip one to your two characters.