 by
by Elden Ring continues its ascent to glory, as players continue (and resume) their journeys within the Interregnum to uncover the mysteries of the Ancestral Ring. With today’s guide, we propose the locations and strategies to defeat all the bosses present in the Altus Plateau and in Leyndell, the royal capital and Leyndell, the ashen capital . This is an area full of bosses, ravines to explore, and very challenging challenges, so be prepared for the best!
ATTENTION: we remind you that reading this guide to the bosses could make you run into unwelcome spoilers on the plot of Elden Ring, linked to the Altus Plateau, Leyndell and beyond, so we invite you to read only with this awareness in mind.

All the bosses of the Altus Plateau
Part of the plateau borders Mount Gelmir, however we have distinguished the two guides, so if you are looking for a specific boss that you will not find in this guide, we invite you to visit the other one as well , because perhaps you will find it there. On the other hand, the guide also includes Leyndell, so we tried to group all the bosses of the capital in one paragraph, later on. We remind you that the difficulty of some bosses may be perceived differently based on the level you will have when you face it.
Mother Tree Burial Guardian (4) – Easy / Medium (at level 60 or higher)
It is located on the Altus Plateau, at the end of the dungeon in the Wyndham Catacombs , located near the ruins of the same name.
This is a very similar boss to the Tomb Guardians we’ve encountered throughout the game, however it does have a couple of features that could make it very uncomfortable to fight. Unlike the other areas you have encountered so far, the arena where you will face it is totally flooded … and needless to say, the element that the cat will master is electricity . Then combine his “standard” attacks with those linked to energy balls thrown at a distance, electricity that propagates on the flooded ground, and you will have a clear picture of what awaits you.
Clearly if you get to the boss after passing level 100 you will not have any kind of problem, while if you venture into the dungeon at 60/70 you will need to be careful . This is a 1-on-1 battle and it could also be fun, so there is no strict need to use evocations or cheeses of any kind. Whatever your build, take on it as usual, but dodge and run away to avoid getting caught in the electricity.
If you defeat him, you will get the Ashy Orb of Convalaria [1] and 12,000 runes as a reward.
Tibial Sailor (3) – Easy
It is located on the Altus Plateau , and you can find it in the middle of the plain / lake near the Wyndham Ruins .
This is not the usual Tibial Sailor, or rather, not quite . Clearly the stats will be increased compared to the two you have already encountered, and he will take less damage when you hit him. Moreover, to annoy, in addition to the skeletons this time he will make real evocations , which will last a few seconds but which are able to really hurt. However, if you implement the usual tactics, you will move away when he prepares to make the attack from above (which instead maybe will kill some of his minions), you will bring home the fight without too much effort. Beware of the skeletons anyway. If faced with a level beyond 100, there will be no story, while with level 60/70 it will take a little patience (also based on the types of damage you will inflict).
If you defeat him, you will be rewarded with 14,000 souls , a Deadly Root and the Summonings of Tibia .
Half-human Queen Gilika – Easy
You will find it on the Altus Plateau, in the Lux Ruins . This is perhaps the simplest of the Elden Ring semi-human queens to defeat and the only one in this guide, since arriving on the Altus and Leyndell Plateau you will probably have already defeated a couple of them (for example if you have passed by Gelmir ) and that you will be at a more than good level.
Once you reach the ruins (don’t be fooled, you have to reach the part on the hill) you will find the usual ladders and go down. Go through the door and the fight will begin. Know that before engaging you , Gilika will do the usual animation of standing up and roaring, so you will have a few seconds free to attack her . She doesn’t have much life, so avoid wasting time summoning ashes, load her head down and maybe you may have already killed her by the time the fight is actually starting. Perhaps one of the simplest bossfights in the entire game.
If he has time to react, he will try to hit you hand-to-hand with his club, and will have some fairly fast movements (the arena is also small, so you may have little room for maneuver).
If you defeat her, you will get 8500 runes , and in the chest in the room behind her you will find the Ritual Sword Talisman .
Sacriderm Apostle – Medium (at level 90 or higher)
You will find it on the Altus Plateau, in the highest part of the Mill Village .
It is an enemy with very varied attack patterns and with a challenging range to manage, although luckily being an outdoor arena we can try to manage it better. He will attack you with a long curved blade, which if necessary will also rotate, also has magical attacks with which he can hit you from a distance. He does not end there, because when he has lost about half of his life, as if the distance reached by his blows is small, he will even begin to stretch his body and make strange movements, so as to reach you in an instant.
If you have a magic or ranged build, try to keep away and if you can use a summon. If, on the other hand, you are a melee player, you will absolutely have to study his attacks, trying to dodge and re-enter the openings he will grant you.
If you defeat him, you will get the Black Baleful Flame magic , the Flaying weapon from Sacriderm , and 14,000 runes .
Perfumer Tricia and Aberrant Warrior – Medium (at level 70)
You will find them on the Altus Plateau, inside the dungeon of the Repugnant Catacombs (you will need, as with some other dungeons, a stone sword key).
This is a relatively readable bossfight, as we are faced with two types of enemies that have already been dealt with previously . The most direct advice is to kill the Perfumer first , although you may have to dance a bit to avoid the hits of the much more aggressive Aberrant Warrior. However, getting Tricia out of your way will almost break the fight, as being a standard humanoid she will die with just over 5 or 6 hits , and you can focus on the Warrior like a normal other boss. The arena factor won’t affect that much. If you call on the ashes of summoning, the fight will be even easier (recommended for wizards).
If you kill them, you’ll get Tricia the Perfumer summon ash and 9000 runes .
Black Knife Slayer (3) – Medium (level 85 or higher)
You will find him on the Altus plateau, he is one of the two bosses inside the Caverna del savio .
Unlike the other assassins we have met, this one will be much more treacherous : in fact it will be able to hide and become invisible , and then take a hold and take a large slice of life from us. One of the ways we have to prevent her from attacking her is by hitting her as she approaches, trying to anticipate her moves , and also regulating ourselves with the water on the ground., which may reveal its location. It is also an agile boss, able to easily dodge many of our attacks. Warning: as also happens with many normal mobs, once the grab animation has started it is really difficult to dodge or block it, so always try to anticipate the moves a little more than usual (also because, as we said, it can be lethal.
Summoning an ash can be very useful, even as a scapegoat when, for example , you lose track of the killer.
If you defeat it, you will get the Covering Veil talisman and 9000 runes .
Necromancer Garris – Easy / Medium (level 85 or higher)
You will find him on the Altus plateau, he is one of the two bosses inside the Caverna del savio .
This boss is also as treacherous and annoying as the other one in the dungeon you are exploring, although you will be able to see him. This time it is a human necromancer, who will not give too many compliments and will immediately start charging you. In fact, this boss uses not only magical moves , such as summoning skulls that will chase you around the room, but also melee attacks with his weapon (do not be fooled, it inflicts a fair amount of damage) and summons, such as the skeletons.
Being an unarmored humanoid enemy, it will not be too resistant to physical attacks , and if you can immediately close it in a corner you will be able to do it a lot of damage already in the very first phase of the fight. To bully him properly, just summon ashes with multiple units, such as the classic wolves or knights.
If you defeat him, you will get the Family Leader weapon and 9000 runes .
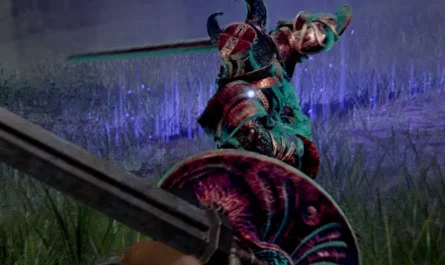
Noble Blood – Medium (level 80 or higher)
You will find it on the Altus Plateau, in the Ruins of Blood .
Don’t be fooled by the humanoid look, because it could really hurt you. He looks a lot like the enemy you met in Liurnia Lacustre, in the church where you met Varré . This boss will attack you with a rapier , and is capable of doing decent damage, as well as inflicting bleeding (and if you are a player who uses it, you know how lethal this can be in combat). He has good attack range , can use a couple of blood spells , and be careful to attack him head down, as he is also capable of parrying .
Try to play it on the defensive, but not too much, pay attention to when it will be in stance for the parry and avoid attacking it. If you want to play it quickly, summon an ash and the fight will end soon, because the numerical superiority will suffer a lot, but always be careful of her attacks. The jump attack is also a good alternative to hurt him.
If you defeat him you will get 8800 runes , and in the chest in the room behind him you will find the Blood Helix weapon .
Stone Digger Troll – Easy / Medium (at level 80 or higher)
You will find it on the Altus Plateau, in the Ancient Altus gallery .
A boss you have already fought in Sepulcride towards the start of the game, and certainly one of the first you have learned to read. Face it as you would face all the giant enemies you meet, but pay attention to the not overly permissive size of the arena, and its attacks that have a very important range (in addition to doing fairly badly). He’s not too slow a boss, so always be prepared to dodge or parry (depending on your build and style). Remember that with heavy blows you can stun him and make him fall for a critical hit.
If you defeat him, you will get the Colossal Club and 9,600 runes .
Onyx Champion (2) – Easy / Medium (at level 90 or higher)
You will meet him on the Altus Plateau, in the Sealed Gallery . It is located in the moat before entering Leyndell. After this boss you can go further, and you will find the passage to one of the two towers of the Plateau.
This is basically the same enemy you faced in the Eternal Galley in Liurnia Lacustre (the one after the Cariano Manor). It will be relatively easy to defeat, especially since his attacks are quite predictable and not too fast. Always pay attention to when meteorites are about to hurl and run around to avoid them. Use the openings to hit him. You can also harm him from afar while a scapegoat will grab his attention from up close (summoning, perhaps a hoplite).
If you defeat him, you’ll get the Onyx Champion’s Greatsword and 16,000 runes .
Omen Slayer (2) and Miranda the Wilted Blossom – Easy / Medium (at level 85 or higher)
It is located on the Altus Plateau, in a dungeon located next to the highest part of the main external stairway outside Leyndell’s outer wall. The dungeon is the Perfumer’s Cave and its door is covered with a giant poisonous flower, which you will have to kill in order to enter.
These are two enemies that you have already had the opportunity to face in the past, individually. In any case, fighting them at the same time will not be very difficult, since Miranda will remain stationary where she is , and that the arena is large enough to allow you to stay away from the poison and dodge the blows of both at the same time (you will have to be mobile enough to avoid that the Omen Slayer jumps on you). You can choose the strategy that suits you best and kill one before the other, it won’t make much difference, even if getting rid of the armed enemy first will guarantee you more peace of mind and will make you feel less hunted down (his attacks hurt like hell).
If you defeat them, you will get the Ax of the Omen Striker and 8500 runes .
Lansseax, ancient dragon – Medium (at level 85 or higher)
You will find it on the Altus Plateau, just east on the map starting from the Church of the Echoes of the Storm . This is the first dragon-type boss you will encounter in this Elden Ring guide dedicated to the Altus and Leyndell plateau.
It is not a flying dragon like Agheel or a stonecutter , but it is equipped with wings, only they will be a less easy target to hit due to their shape and size. Focus on paws and belly if you are a melee fighter.
To face Lansseax we advise you as always to stay on horseback to have greater mobility and to quickly reach the boss in case he moves away or prepares attacks from above. His attacks result in very fast electric claws , and very annoying red lightning bolts , while if you stay too under him he can make a charged attack that will throw you off the horse (as well as damage you). Attention, there is no shortage of swoop attacks and the fiery breath , so watch out which attack he is about to launch in order to better counter it.
If you defeat him, you will get 72,000 runes and the Lansseax Glaive spell .
Black Knife Assassin (4) – Medium (at level 95)
You will find it at the door of the Tomb of the Blessed Hero, on the Altus Plateau.
This is the first boss of this type you will face outside , so you may have better room to maneuver, but be careful because he can quickly cover a lot of ground and get close. He uses different types of moves, starting from the infamous grip that will stab you, pine for jumping attacks, quick dodges, lunges, blades of red magic that hit you from a distance, and so on and so forth.
You can choose whether to fight on horseback , but it is not too recommended , especially since it could throw you off with a couple of well-aimed blows. If you are devoted to melee attacks , wait for her to jump attack to dodge towards her and hit her, you will have an opening. Always try to hit her with single hits, but know that she will quickly get away. The easiest way to hit her is to wait for her to engage her, dodge or parry, and then respond before she leaves. If you are a wizard , choose your spells well, they must be fast and quick to cast, and used when the Assassin probably won’t dodge (we recommend the Dazzling Spear faith spell ).
If you defeat it, you will get the Black Knife and 10,800 runes .
Antoco Hero of Zamor – Easy (at level 90 or higher)
You’ll find him on the Altus Plateau, as the boss of the Tomb of the Blessed Hero .
This is a boss that you have already faced in Elden Ring on the peninsula of weeping, and that this time you will face again with the improved stats, the only one in the Altus and Leyndell plateau guide. It is a real copy , and fighting him will not be a problem: you already know his movements, and this time you can also find help from the ashes of summoning .
Pay attention to the frostbite status and the attacks that will have it back on you in a flash . Get around it when it makes the magic attack that freezes the floor, and be ready to dodge when it starts spinning. The second part will be slightly more problematic, but the openings to hit it will always be the same.
If you defeat him, you will get the ashes of the Ancient Dragon Knight Kristoff and 20,000 runes .
Livface – Medium (level 90)
It is located on the Altus plateau, near the minor Mother Tree (the one below the Village of the Mills). He is the only boss of this type in the Elden Ring guide, although the game puts us in front of several of these abominations, even in “small” format, of which the plateau in that area is littered (you will not find them at Leyndell).
It is a very tall monster, which is capable of inflicting deadly disease with its magic. You have to be very careful, because a well-placed blow is enough and in less than two seconds you will be infected (and dead), so you must necessarily be able to dodge them. In addition, if you are on average close, it will try to make a hold, even one with the ability to infect and kill you.
There are no particular tactics to fight him, if not to kill all the minions in the area (at least 5 or 6), and groped to attack him from behind or from a distance. Please note that in addition to being faster, if you are on horseback the Facciadiverme will not be able to make the grip and will fail, so you can take advantage of it. Beware of his attacks, they even come from a distance, and can throw you off the horse (even then, almost instant death because you could not escape the disease while you are stunned.
If you defeat him, you will get 10,000 runes , the Spotted Solid Tear and the Crimson Liquid Crystal Tear .
Night Rider (7) – Easy
You will find it on the main road just in front of the large freight elevator at the beginning of the Altus Plateau. Like all other bosses of this type in Elden Ring, although the only one in the Altus and Leyndell plateau guide, you will only encounter him at night.
This is one of the usual Night Knights, and you’ve probably already had a callus on it. Your opponent will be armed with a scourge , as also happened in the Peninsula of Weeping , and will not be too complicated to defeat: the space to face him is large , the enemy’s stats are not very high, since if you have arrived in this area you will already have a good level, and has no particularities compared to the other riders. The only trick is to clear the area of enemies that could bother you while you fight, such as the golem archer or some soldiers who are patrolling.
If you defeat him, you will be rewarded with War Ash: Shared Order and 10,000 runes .
Godefroy the grafted – Medium / Difficult (at level 90)
You will find it in the Eternal Galera of the Golden Lineage on the Altus Plateau. To unlock the entrance you will need a stone sword key . This is the last Eternal Galera of Elden Ring , as well as the only prison boss present in the guide dedicated to the Altus and Leyndell Plateau. Try to start the fight with the ampoules to the maximum (which you will deafult if you die and start again from the Marika statue next to it).
This is an enemy who uses grafts, like Godrick . He will attack you with a large ax with melee attacks , but also with wind spells , which in addition to creating an area around him that damages you when you are close, will also see him throwing balls of wind and debris , always in pairs . one after the other. Her combos of him are of medium speed , so fairly readable and avoidable with the right timing. Despite this, it is not advisable to stay under him continuously, because he is able to inflict great damage, and is hardly stunned by repeated attacks. Also, when he is at a distance, he will perform somersaults to approach, which he will follow either a ranged attack, or a devastating jumping ax. We therefore advise you to undertake a battle in resistance , with little damage at a time as soon as you can, with melee or ranged magic attacks, perhaps even helping you with altered statuses such as poison.
If you defeat him, you will get the Godfrey Icon talisman and 26,000 runes .
Crystallian (Spear) and Crystallian (Circular blade) – Easy / Medium (at level 90)
You will find it on the Altus Plateau, in the Altus Gallery , which is located near the minor Mother Tree where there is Facciadiverme. This is the only boss with two Cristallians that you will find within the guide of the plateau and Leyndell.
These are two simple Crystals, with no changes whatsoever to patterns or powers. You have already encountered both types of weapons in previous guides , so the only difference in combat is in the level of the enemies. Use blunt weapons as always to be able to break the defense as soon as possible, and use a summoning to establish parity or numerical superiority.
If you defeat them, you’ll get the Miner’s Ashy Orb (Funeral) [2] and 1800 runes .
Meteorite Beast – Medium (Level 90)
You will find it on the Altus plateau, in a crater that you will encounter along the cliff to the south of the region, reaching the bottom , almost to the walls. It is one of the three meteorite beasts that you will find in Elden Ring, but the only one featured in this boss guide dedicated to the Altus and Leyndell plateau.
You have already encountered this beast as a boss in a Caelid dungeon, and it will feature the same moves, with the difference that you will have more wiggle room and can fight it on horseback . It goes without saying that then, compared to the last fight, you will be more facilitated. Always pay attention to his charges and his gravity spells, try to be very elusive, and where you can attack him from a distance or close if he grants openings.
If you defeat it, you’ll get 11,000 runes , 1 Funeral Forging Stone [5] , 5 Forging Stones [6] , 10 Gravity Stone Fans and 1 0 Gravity Stone Blocks as a reward .
Dueling Tomb Guard (2) – Easy (level 85)
You will find him as the boss of the secondary Tomb of Auriza dungeon on the Altus plateau near Leyndell to the east, a boss that you have already met almost at the beginning of the game and that is identical for this guide.
You already know the type of enemy, and he returns to have the hammers with which we first encountered him in Sepolcride . Exactly the same strategies, and the same way to fight it. Only a greater power changes due to the more advanced zone, and clearly an increased amount of life. You shouldn’t have big problems fighting it, but try to get there with an adequate level.
If you defeat him, you will get 15,000 runes and Mercenary Jar Ashes .
Bird of Death (4) – Medium (at level 95 or higher)
You will find it on the Altus Plateau, in the small plateau next to the minor Mother Tree within the first Leyndell wall. Like the other bosses of this type, even in the guide of Plateau and Leyndell, he appears only at night .
After a long absence, the “simple” bird returns, which does not make use of magical attacks or upgrades of any kind. The challenge will lie in defeating him – with the same tactics as always – with the disturbance of the rolling animals that roam the arena, and with a space that is not very large after all. You are used to worse challenges, and you will probably be able to handle the fight quietly from a horse, trying to get rid of the rolling snails / skulls first to focus on the boss.
If you defeat him, you will get 29,000 runes and the Double-headed Bird Shield .
Ashen Globe Hunter (3) – Hard (level 100 and up)
You will find it on the Altus plateau, in the hermit’s hut . ATTENTION! Unlike the other bosses of his type who only appear at night, this Hunter in the plateau guide and Leyndell appears at Noon instead !
Aside from that difference, the combat modes are always the same, and he’ll be an awkward customer as ever. Try to stall, don’t get hit, and hurt him from a distance. Don’t face it if you haven’t reached an adequate level.
If you defeat him, you will receive 20,000 runes and the Medicine Walking Orb .
(TROPHY) Elmer del Rovo – Medium / Hard (at level 100 or more)
You will find this boss at the end of the Castellombroso area on the Altus Plateau, which you will reach by proceeding north from the giant freight elevator that took you to the Plateau.
If you want to make it easier to win, you will necessarily have to have support from a summoning ash , because it is a boss that can defeat you in a few hits: you know the Ashen Orb Hunters ? Well, Elmer is one of them, but not an invader. The worst part is that you will have to face him in a very small room (compared to the other areas where you fought with the Hunters), without a horse, and full of obstacles that can get in the way of the fight. His moves will be lethal, quick, but and you are far below him, he will use telekinesis lessand he will try to hit you normally, so deal with him as if he were a Knight of the Crucible, studying the timing of his attacks and hitting him when he presents the openings.
If you defeat him, you will get the legendary sword Sword of Executioner of Marais , the Pavese shield of the bramble and 24,000 runes .
Tree Sentinel (2) and Tree Sentinel (3) – Hard (at level 90)
You will find them on the Altus Plateau, at the end of the steps leading up to the first Leyndell city wall .
If you remember the boss you had to face in Sepolcride right after the tutorial, you will also remember how annoying this type of enemy is. Well, this time you will face two at the same time, and the drop will only be obtained when both have been defeated.
You start from the assumption that if you are not on horseback, it will be really difficult to evade the blows of 2 sentries (who will have two different weapons), so Torrente becomes indispensable (also because the space in which you will fight will be a little tight). An evocation will come spontaneously and will be almost mandatory in order to legitimately face the sentries one at a time, and will also allow you to take advantage of some attacks from afar. If you’re a wizard, go for fast-cast attacks to deal damage taken and dodge before you get caught. Poison and rot can be good gimmicks.
If you defeat them, you will get 20,000 runes , 1 Hero Rune [1] and the Oplon Shield from the Mother Tree .
Crucible Knight (3) and Ordovis Crucible Knight – Hard / Very Hard (At level 100)
This is the boss that you will find at the bottom of the Tomb of the Hero of Sauriza , on the Altus plateau. This is one of the toughest bosses you’ll find in this Elden Ring Altus Plateau guide before entering Leyndell.
What’s worse than fighting a Crucible Knight ? Fight two at the same time ! There aren’t too many tips to give, at least not unlike what we’ve given you for the other knights you’ve faced. First of all it is highly recommended to have an evocation from one’s own , to make sure that they also focus on her or divide .
An important strategy would be to get them both to be attracted by the Reflected Tear summon (which despite succumbing sooner or later, is able to hold up more time against the two), and once they are focusing on her, inflict on both of them at the same time. area attacks , to take some life out. If you use the breath that inflicts scarlet rot, you will have on your side an excellent ally to do damage over time. However, we advise you to then focus more on one of the two until he gets it out, and then equalize the numerical inferiority and fight as usual.
If you defeat them, you’ll get 28,000 runes and the full Ordovis set: Ordovis Greatsword , Crucible Ax Helm , Crucible Ax Chestplate , Crucible Gauntlets , Crucible Greaves .
Dragon Tree Sentinel – Medium (at level 95 or higher)
He is the only boss of this type present in the Elden Ring and in this guide, and you will find him at the entrance of Leyndell , going around the plateau and entering from the upper right part of the inner wall . Behind him is the door that will allow you to enter Leyndell .
Despite sharing several characteristics with the “normal” Mother Tree Sentinels, this one possesses more dangerous and more damaging attacks . However, there is limited mobility to her disadvantage: she tends to move less and is slower, so you could use ranged attacks to your advantage . This is above all because with his blunt weapon he is able to make devastating attacks that can take a large chunk of life from you. Watch out for red lightning too! If you summon an ash it will be very easy to get rid of it, if you are at an adequate level.
If you defeat her, you will receive as a reward 50,000 runes and her weapons: Dragon ‘s Great Claw and Dragon’s Claw Shield .
All the bosses of Leyndell, Royal Capital and Ashen Capital
These bosses are always located on the Altus plateau, but specifically addressable within the walls of Leyndell, the royal capital and the ashen capital , and consequently we have dedicated a separate section of this Elden Ring guide to the 10 bosses that can be faced here. Many of these will also guarantee you the achievement of a trophy .
(TROPHY & BOSS STORY) Godfrey, first ancestral Lord – Medium (at level 95)
You will meet him in Leyndell, Royal Capital , after climbing the tree roots (starting from the grace point after the giant dragon you “climbed” and following the road to the location of the boss fight. He is not an optional boss .
A lot about the difficulty of the boss depends on the level you will have when you face him. You can face him already around level 80 if you are stubborn, and still have won, as long as you pay close attention to his powerful attacks. If you face it when you have already passed the 95/100, it will probably be a walk of health , especially if you also approach the evocations and help of the case.
As you can imagine looking at it at first glance, it is a sort of spirit , and not the “flesh and blood” form of Godfrey (which is also found in Loretta , for example ). The boss’s attacks result in powerful ax hits, whether from the ground or from above, collapsing on you with impetus, but also stomp that create earthquakes capable of damaging you in the area (crucible knight style, but wider) . There is no stage 2 . As wizard players usual ranged tactics , nothing unusual, as melee players will have to read his movements and dodge towards him to attack him during the many openings, since he is a bossquite readable , with attacks that are not really fast but that have variable speed and rhythm , so be careful. You can take advantage of the shield parry if you have physical defense at 100.
If you defeat him, you’ll get a very useful Talisman Bag and 80,000 runes .
(TROPHY & BOSS STORY) Morgott, the Omen King – Medium / Hard (at level 95)
You will find it in Leyndell, the royal capital , at the entrance to the Mother Tree. After defeating phantom Godfrey, continue to the Queen’s Bedroom Grace point , and then continue to the combat arena. This is a boss that could give several players a hard time, especially if faced with an inadequate level. If you remember the bossfight with Margit, you can also find some similarities with the King Omen. Before starting the fight, you can summon Melina to fight alongside you via the golden summoning sign.
It has a very varied range of attacks, ranging from sword attacks (with a very wide range), attacks with the hammer of faith, daggers at a distance, spear of faith and so on: in short, in addition to reading its movements, you will have to act also very instinctive . In any case, we are faced with a much more spacious arena than the one in which we faced Margit, and consequently we will be able to better manage our spaces, dodges and tactical escapes. In the second phase she will add arrows of different types to her quiver, adding more attacks to her pink, perhaps combining some of the already existing moves, and the arena will fill with shallow water (which will not affect the fight much) .
If you are a melee fighter , a good covering fire could be useful , or an ash that acts as an additional blade to do as much damage as possible right away. It will be important, however, to stay at medium range and only attack when possible, as many of Morgott’s attacks are also fast, and the aforementioned variety could also make you catch by surprise. Mages always keep the medium distance, but try from time to time to attract his attacks and neutralize them, in order to keep their summoning or Melina alive as long as possible.
Defeat him and you will get 100,000 runes , the Omen King’s Remembrance and Morgott’s Major Rune .
Relentless Twins – Easy
You will meet them in Leyndell, the royal capital, on the bridge that takes you to the Divine Tower to the east .
You won’t see them right away, and as you cross the bridge chasing an unsuspecting soldier, the sky and then the entire screen will turn black , and only you and your opponents will remain visible (a scene from Soulsiana memoria). These are two Omens , similar to some you have encountered in some catacombs or around the game world. The peculiarity is that you will fight with the two at the same time, even if one will be a little more shy and will join you later. Take advantage of it clearly to do as much damage as possible to the first one (the one armed with an ax ). The second, who will come to give him a hand, is armed with a great sword .
The fight is not too complicated, given that the two omens suffer a fair amount of damage, and they will never actually be on you together: the one armed with a sword in fact also has magical attacks , and therefore will also entertain you to cast you against. some magic. The only thing that might be a bit confusing is the complete lack of reference points, given the darkness of the arena, and therefore you could lose your compass (especially when you don’t understand where the enemy might attack from). Once this problem is solved, whatever your build is, you will have a fairly easy life.
Your reward will be the Ashes of Rollo the Omen Slayer and 29,000 runes .
Esgar, blood priest – Easy / Medium
You will find it in Leyndell, the royal capital, in the Undergrounds of the Outcasts .
This is a fairly particular bossfight, which does not appear too complex , but which could put you in difficulty if you have a slow build. It is a humanoid boss who is accompanied by two dogs that inflict bleeding (like himself). Quick, he dodges quickly and with some spells that can annoy you, as well as melee hit and run attacks .
First, kill the dogs, which you can get rid of with a couple of well-aimed headshots, to be able to deal only with him (it is advisable to have a shield and counterattack, for this phase). Once you switch to Esgar, pay close attention to his speed, and you may not have to be outdone. If you have a heavy sword, try to lock it in a corner in order to limit its escape routes , and torment it with blows (it is humanoid, and has little balance and defense). With a medium / fast melee build , you will have to pay back with the same coin, or use throwing items to make him stop for a few moments, reach him and hit him repeatedly.
With the magic build you can attack repeatedly as always, but try to exploit spells that do more damage, and with a quick cast (the boss is very elusive).
If you defeat him, you will get the Bloodlord ‘s Jubilation Talisman and 30,000 runes.
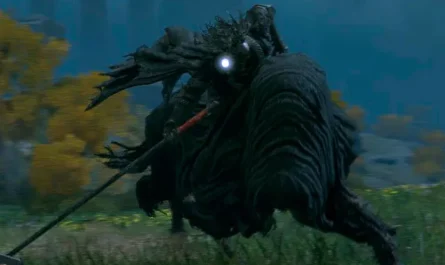
(TROPHY) Mohg, the Omen – Very Hard (Level 110 or higher)
You will find it in the sewers of Leyndell, the royal capital. The road to get there is really long, so arm yourself with patience as you enter the well to access the sewers onwards.
He is one of the toughest bosses to beat both in this Altus and Leyndell Plateau specific guide, and in Elden Ring in general, and the worst part is that you will meet him twice . This is due not only to a mammoth life bar , but also to the high resistance to practically any type of attack. The thing that in any case can make us – partially – breathe a sigh of relief, is that its range of moves is quite limited , but that does not mean that it is less lethal.
Fighting it with a hand-to-hand strategy will certainly be a tiring job, as the large amount of life to take away will take a long time. In addition, it will be very important to learn the timing for the dodging of his attacks, which often change and require you to roll at the last moment . Watch out for all of his attacks, and try to back away when he throws the red powder that ignites.
If you have a magical build, always try not to take damage, as you will have to balance the ampoules a lot , dividing them between life and mana. In your case , the evocation of the Reflected Tear (or another leathery one) will be very useful, since you will have to try to spam magic attacks on repeat without being riddled with shots by Mohg. The Comet of Azur tactic, if you have intelligence builds, can go in combo with summoning.
Whatever build you use, be quick and dodge well, because his melee attacks are really bad , so also consider staying at medium distance often, as far as the arena can grant.
If you defeat him, you will get the Talons of the Bloodflame spell and 100,000 runes .
(BOSS STORY) Sir Gideon Ofnir, the Omniscient – Medium / Hard (from level 110)
This boss will only be available after defeating Mailket . You will find it in Leyndell, the ashen capital, in the same spot where you faced the ghost of Godfrey, the first ancestral lord. He is one of the story-related guide bosses you’ll find in the plateau and Leyndell, but the first without a trophy attached.
This is the one with whom you have often spoken at the Round Table, in the library. Don’t be fooled by his rather quiet manner, because you are dealing with a very talented wizard, and who uses magic for practically every element and type . It goes without saying that this boss is much more vulnerable to melee attacks, having less physical resistance, but that it will be less easy to approach because it is elusive and with different spells ready to hit us and prevent us from getting close. Magical swords , black fire flames , blades of light , energy wavesstonecutter and many other attacks of these types will be truly a thorn in your side. It does not end there, because he will also have ampoules available to heal his life , and leaving him too alone means having to do part of the work all over again. The good thing is that he doesn’t have a stage 2, which makes him less of a challenge than other bosses.
To defeat him you can adopt a tactic from a distance , if you are also a wizard, with spells able to unbalance him (and consequently not making him escape), and then hit him hard with other spells / sorceries. The faster they are, the better. Clearly a summoning of ash will make things a lot easier for you, as it will often focus on them, if you keep your distance , and if they are tough and tough (like hoplites, knights and the like) they can give repetitive blows, which together with yours will give him very little time to recover and heal himself (but he could still continue to attack, be on guard and ready to dodge).
If you are a hand-to-hand combatant you may have a slightly more complicated life due to its sudden escapes and practically infinite mana. Try to get close by dodging his attacks and hitting him hard. Bleeding and DOTs could be a good way to do a lot of damage together and force him to cure, or cause it over time. Jump attacks and heavy attacks, if successful, can be useful in slowing and unbalancing him, exposing him to critical attacks. We recommend light armor , but it will protect you from various types of magic. Clearly, even in this case, the summons are your friends.
If you defeat it, you will gain 150,000 runes , the Scepter of the Omniscient , the Helm of the Omniscience , the Armor of the Omniscience , the Gauntlets of the Omniscience and the Greaves of the Omniscience .
Video of our upcoming fight, Powerpyx video to simply defeat him, below.
(BOSS STORY and TROPHY) Godfrey, 1st Ancestral Lord (2) and Hoarah Loux, Warrior – Hard (at level 110 or higher)
You will meet them in Leyndell, the ashen capital, in the square of the Mother Tree , after defeating Sir Gideon Ofnir, he is the second boss of the story in this guide to the Altus plateau that will be unlocked after defeating Mailket .
It is a two-phase boss (and not a double, as the name might seem). The first phase will see us face Godfrey as we have already known him, only in flesh and blood … and therefore much stronger in the attacks, and with a much more abundant life bar . Apart from an explosion of spikes that will expand to 360 °, there are no particular differences from the first fight you did against him, except that you will be required to pay more attention in not getting hit and in learning his attacks. to dodge / parry them at best.
Things get complicated with phase 2, in which shortly after taking half of his life, the boss will start fighting as Hoarah Loux, warrior . Once he’s in this form, he’ll fight hand-to-hand, give much more direct melee, quicker, and wrestling-style grapples and throws . He be very careful, because some builds could suffer a lot from this type of attack, and could kill you even with a single hit . He will jump often, make beast-like movements, and make powerful area attacks , charged and unloaded.
Fighting him hand-to-hand could be problematic , because if you are alone he will give you no respite, and to dodge his constant attacks you will have to carefully read his movements (which are unusual compared to all the other bosses you have encountered). Jump if he’s creating shockwaves, dose stamina and dodge , otherwise you won’t have any to attack during the few openings he’ll grant you. With an Ash Summon ( Reflected Tear Over All) it will be easier not to be targeted, but know that sooner or later it will probably take enough damage to succumb, leaving you alone again. If you can, use bleeding weapons.
With the magical build you will have a slightly easier life to attack, but you will always have to be very careful not to get killed by its attacks, dodging well. Summoning will be even more useful for you because you can spam spells to no end (remember to distribute the ampoules before the fight), and never like in this case we recommend quick cast spells.
If you defeat him, you will get the Remembrance of Hoarah Loux and 300,000 runes as a reward .
(BOSS STORY) Radagon of the Golden Order and Ancestral Beast – Hard / Very Hard (at level 120)
You will find him in Leyndell, the ashen capital , after defeating Hoarah Loux. In this case they are two bosses that you will have to face one after the other . This is the final boss not only of the guide of the plateau and of Leyndell, but also of Elden Ring,
You will start with Radagon , with humanoid features, but slightly larger. From him she has very powerful attacks, thanks to his ancestral power. He will jump up and swoop down on you with his hammer , not only doing bludgeoning damage, but also creating an area of effect around him, also has magical attacks , will deceive you with teleporters , will cast lightning -like spells and so on. . Whatever build you use, it is very important to be able to alternate dodging at the right time and parrying , especially since he will often continue to attack you. If you have a melee build , pay close attention tocreate openings through dodging towards him , perhaps after he has finished certain attacks. With a magical build you can avoid risking him, but even more so, by attacking from a distance, you will have to be very precise in parrying and dodging his attacks from a distance. While it’s not exactly easy, it shouldn’t take long to learn his moves and fight him, but it’s when you defeat him that the real challenge will begin.
After Radagon, in fact, here is the ancestral beast in front of you , a boss with an abnormal amount of life and a very high resistance . It is a very large (but not huge) creature , so be careful when trying to lock the camera on it, as you may lose perspective. She will attack you with magic in different ways, with light that will take a good part of the arena in her area of hers, or direct attacks from a distance , but also with her huge sword , with which she has a very high range. . Beware of her when she jumps into the farmyard, because hersSwoop attack is devastating. Roll to dodge it . He also has holds , so always keep an eye on what he is preparing for you . When it reaches mid-life , it will also add a comet of light (with other little ones to accompany it) to its roster of attacks that will chase you in search , so run as much as possible to avoid getting hit. Be careful, because a certain one can evoke ancestral rings , which you will have to dodge by jumping or rolling.
If you have a melee build , know that in some cases (especially in the first phase) if you manage to get around it , you can take a few seconds to make attacks from behind while it is busy with some of its spells, so try to close the distance with you in the shortest time possible, and always be ready to dodge . In general, this is a boss that has many different attacks, and you will have to behave situationally, so a lot will also depend on your skills in fighting. If you are a wizard, try to keep at medium distance to keep the beast within your reach, but you will be very subject to its attacks, so always try to alternate attacks and craps / parries. The Reflected Tear could be a good hand, so try to save ampoules and summoning for the beast , as you will need them.
If you defeat them, you will get the Ancestral Remembrance and 500,000 runes .