Chevreuse is a 4-star Genshin Impact character that is quite curious, since despite being a Healer , she really stands out for being a fairly consistent buffer for teams based solely on generating Elemental Overload Reactions continuously.
He is a character that differs greatly from other Supports that increase the damage of a specific Element, as happens for example with Faruzán for the Anemo, with Gorou for the Geo or with Kujou Sara for the Electro, since Chevreuse’s function is to improve largely the damage of pure Overload teams that do not have any characters other than Electro or Pyro instead of boosting a specific Element.
Certainly, Overload is an Elemental Reaction that had been largely forgotten because it is not particularly harmful and because it can sometimes be annoying by sending small enemies flying, but thanks to this character it will be worth carrying equipment again of this style (as happens with Nilou in Bloom, which is an Elemental Reaction that was greatly overshadowed by Overbloom and Crackle).
CHEVREUSE STATS
Chevreuse’s stats aren’t too good, but at least he excels at something. These are the ones he has at 90:
- Base Life : 11,962
- Base Attack : 193
- Base Defense : 605
- Life % : 24%
Its Base Attack is frankly low and leaves a lot to be desired, while its Base Defense is also poor and is easily surpassed in both aspects by any other spearman like Thoma or Xiangling. However, he has a fairly high Base Life for a four-star character, which won’t hurt us at all.
By promoting Chevreuse, he will receive bonuses to his Life% , something that is quite good for us because he has a Passive Talent that grants a bonus to the Attack of the entire group based on the Maximum Life of this character and his healing also scales based on the same parameter.
TALENTS OR SKILLS
Let’s look at your talents or abilities.
NORMAL ATTACK: VANGUARD BAYONET (MODIFIED)
Very similar to those of other spearmen, but with a shorter combo:
- Normal Attack : A combo of four quick attacks with a spear, normally spearmen do one or two more hits with this type of attack.
- Charged Attack : Consumes a certain amount of stamina to make a horizontal charge against enemies.
- Descending Attack : Diving attack that, upon hitting the ground, will inflict physical damage in an area to enemies.
ELEMENTAL SKILL: RAPID PROXIMITY FIRE AND INTERCEPTION
- TdE : 15s.
- Damage on Press Once : 207.36% (level 10).
- Hold Damage : 311.04% (level 10).
- Overcharged Spike Bullet Damage : 508.32% (level 10).
- Healing Duration : 12 seconds.
- Continuous Healing : 4.8% of Maximum Health + 564.98 (level 10).
- Hold Damage : 311.04% (level 10).
- Overcharged Spike Bullet Damage : 508.32% (level 10).
If we use this Elemental Skill by pressing once, Chevreuse will launch a bullet that will inflict Pyro Damage in an area and after this, a continuous healing effect will be activated that will heal the character who is active on the field for 12 seconds.
We can also use this ability by holding it down, so that we can aim and increase the damage inflicted by this attack. Additionally, Chevreuse gets a stack called Overload Spike Bullet every time a team member generates an Overload Elemental Reaction (you can only have one at a time).
If we use the Elemental Skill while we have this overload spike bullet, we will inflict an additional attack that will deal significantly greater damage than the skill itself.
ULTI: RADIAL BOMBARDMENT
- Energy Cost : 60
- TdE : 15s.
- Explosive Grenade Damage : 662.69% (level 10).
- Secondary Bomb Damage : 88.36% (level 10).
When using this Ultimate Skill, Chevreuse will initially launch a grenade that will impact enemies to deal Pyro Area Damage. After this, the grenade will in turn divide into several smaller bombs that will be placed in a circular area to the impact zone of the initial grenade to explode after a few short moments.
This Ulti is quite similar to the one Kirara has , since they work in the same way, only that Chevreuse’s secondary bombs explode almost instantly unlike Kirara’s, which explode after 12 seconds or when stepped on by an enemy. .
PASSIVE 1: COORDINATED SURVEILLANCE
If the team is made up of only Pyro and Electro Element characters (and there is at least 1 of each), when a team member performs an Elemental Overload Reaction, the enemies’ Pyro and Electro Resistance is reduced by one. 40% for 6 seconds .
Certainly, it is a very restrictive Passive Talent that forces us to play with Overload teams if we want to get the maximum potential out of Chevreuse (it is a bit similar to the case of Nilou ), but the truth is that it is a brutal passive, since it is like having the effects of Emerald Green Shadow permanently when playing with this type of equipment.
PASSIVE 2: INTEGRAL LINEAR FORMATION
When Chevreuse uses his Elemental Skill, he will increase the Attack of all Pyro and Electro Element characters on the team for 30 seconds. This Passive Talent will grant +1% Attack for every 1,000 points of Maximum Life that Chevreuse has.
At most, the bonus can reach +40% Attack, so our Chevreuse will at least have to have 40,000 points of Maximum Life if we want to reach the maximum possible attack bonus.
PASSIVE 3: TACTICAL FAST MARCH
By having Chevreuse on the team, the stamina cost when sprinting will be reduced by 20%. It cannot be stacked with other similar Passive Talents.
It won’t hurt us at all when exploring and to reduce stamina consumption while fighting, this Passive Talent is the same one that other characters like Kaedehara Kazuha have .
CONSTELLATIONS
Let’s now see everything we can achieve through its Constellation:
- C1 – Front Stabilizing Resilience : When a character on the team other than Chevreuse generates an Elemental Overload Reaction, they will recover 6 points of Elemental Energy (this effect can be activated 1 time every 10 seconds).
- C2 – Sniper Detonation : After using the Ultimate Skill, we will have 6 seconds in which Chevreuse’s Elemental Skill will not enter TdE (2 uses maximum after using the Ulti once).
- C3 – Artifact Recharge : Increases the Elemental Skill by 3 levels, it can be increased up to 15 levels.
- C4 – Technique – Quick Multishot : After using the Ultimate Skill and holding down the Elemental Skill, it will not enter TdE and we will have a maximum of 6 seconds to be able to use it 2 more times.
- C5 – Incremental Firepower : Increases the Ultimate Skill by 3 levels, it can be increased by up to 15.
- C6 – Evil-Defying Pursuit : All team members will recover Life in an amount proportional to 10% of Chevreuse’s Maximum Health when the 12 seconds of the healing effect of his Elemental Skill expire. Additionally, each character who is healed by Chevreuse’s Elemental Skill will gain +20% Bonus Pyro and Electro Damage for 8 seconds (these charges can stack up to 3 times and each will last 8 seconds independently).
THE BEST BUILD FOR CHEVREUSE ( SUPPORT HEALER )
In the case of this character, the best thing we can do is focus on boosting his Life as much as possible so that he can generate decent healing while increasing the Attack bonus he provides after using his Elemental Skill, since the main points of This character is the unique bonuses that he brings to the group while occupying the position of Healer .
BEST WEAPONS FOR CHEVREUSE
These are the spears that I recommend the most for Chevreuse:

Retribution of Justice
+27.56% to Life %. +8 points of Elemental Energy when the wearer receives a cure (1 time every 10 seconds).
Black Tassel

Lance of Favonius
+30.63% Energy Recharge. 60% chance to generate elemental particles when landing a Critical Hit.

Heavenly Spike
+36.8% to Energy Recharge. +8% to Critical Chance and +12% to Attack Speed. 50% chance to generate a hit that deals 40% Physical Damage when attacking with Normal or Charged Attacks.

Kitain Cross
+110 Elemental Mastery. +12% Elemental Skill damage. -3 Elemental Energy when hitting with the Elemental Skill, but in exchange +3 Elemental Energy every 2 seconds for 6 seconds.
BEST ARTIFACTS
Regarding Artifacts and their set:
- Helmet : Life %.
- Clock : Life %.
- Chalice : Life %.
As substats we look for the following:
- Priority : Health, Health, Energy Recharge and Elemental Mastery.
- No Priority : Critical Chance, Critical Damage and Attack %
And to finish, your Artifact Set , we have the following options:

They are from yesteryear
2 Pieces: +15% Healing Bonus. 4 Pieces: When healing, the amount of Health recovered will be recorded for 6 seconds (including overhealing). After this, the character in use will increase the damage of his Normal/Charged/Descending Attacks and his Elemental and Ultimate Skills in proportion to 8% of the registered Life (15,000 Life maximum). This bonus is removed after being activated 5 times or after 10 seconds.
On the one hand, it will improve the efficiency of his healing, something that is not a bad thing since he is not one of the best Healers in the game. On the other hand, he will allow us to generate a damage buff that will benefit any DPS , regardless of whether his damage scales based on his Defense, Attack or Life.

Ancient Ritual of Nobility
2 Pieces: +20% damage to the Ultimate Skill. 4 Pieces: After casting the Ultimate Skill, +20% Attack for 12 seconds for the entire team.
In this type of build, the damage bonus for its own Ultimate Skill will not be of much use to us, since it is not what we are looking for, but the four-piece set of this Artifact Set will at least allow us to further enhance the Attack of our companions.
BEST TEAMMATES
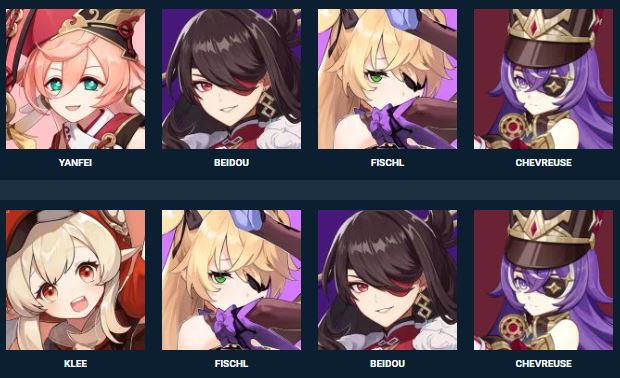
Logically, Chevreuse will always go in Overload teams since it is the only team composition in which we can take advantage of the multiple advantages it offers. In her case, it will be crucial to take her with characters who apply their respective Element a lot, since we will need to generate Overloaded continuously to keep the enemies’ Elemental Resistances reduced.
EQUIPMENT OVERLOAD

ASCENSION MATERIALS AND TALENT BOOKS
We will need the following materials to promote you:
- Agnidus agate.
- Fontamarino Steed Horn ( Pearlmillennial Sea Steed ).
- Lumidulce Bell .
- Gears.
And as for Talent Books and so on:
- Books of Order.
- Gears.
- Eye of the Dull Vortex ( Star-Eater Narwhal ).
- Crown of Wisdom (Talent at level 10).
